
En prévision de cet incident à domicile, il est recommandé de se munir de l’outil suivant :
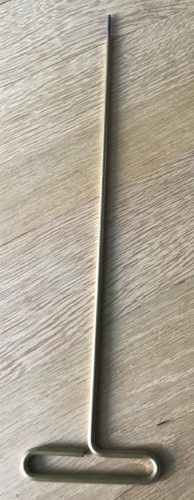
À la suite de ces incidents répétés, les fabricants ont généralisé l’usage d’écouvillons dotés d’un cordon de sécurité à chaque extrémité (cordon de rappel), ce qui réduit la fréquence de ces blocages.
Toutefois, l’utilisation d’anciens modèles dépourvus de cette sécurité présente un risque de coincement élevé.
Cette situation mécanique est particulièrement fréquente chez les jeunes élèves, nécessitant une intervention rapide de la part de l’enseignant pour restaurer la fonctionnalité de l’instrument.
English
Emergency removal of a swab stuck in the drill hole.
To prepare for this type of incident at home, it is recommended that you have the following tool on hand:
Thanks to its threaded design and the length of its shaft, rotating this tool as you insert it into the drill hole allows it to wrap around and grip the fabric fibers. The swab can thus be removed without damaging the inner surface of the wood.
Following these repeated incidents, manufacturers have widely adopted swabs equipped with a safety cord at each end (retrieval cord), which reduces the frequency of such jams.
However, the use of older models lacking this safety feature poses a high risk of jamming.
This mechanical issue is particularly common among young students, requiring prompt intervention by the teacher to restore the instrument’s functionality.
In the absence of this specific tool in an emergency situation before a performance, an alternative procedure can resolve the jam.
Using the main left-hand rod (the rod supporting the B, A, and G keys) as a pusher allows the fabric knot to be pushed back toward the wider section of the bore. The time required for this operation is proportional to the initial force applied to the cloth.
After removing the rod from its mechanism, use it as a pushing tool. By applying repeated light taps to the end of the rod using a knife handle or a small precision mallet, the fabric knot retreats and loosens inside the tube. Once the fabric has been pushed back far enough, use a small metal hook to gradually pull the folds of the cloth through the successive channels of the pitch holes until there is sufficient grip to grasp it by the lower end of the body. This procedure requires methodical execution and consistent tapping.
It is imperative to refrain from any attempt to forcibly pull the fabric toward the upper part (the narrowest section of the bore). This action invariably causes a permanent blockage. The radial pressure exerted by the compression of the textile knot against the inner walls can cause structural failure and the wood to split.
Deutsch
Notfall-Entfernung eines in der Bohrung festsitzenden Tupfers.
Um auf einen solchen Vorfall zu Hause vorbereitet zu sein, empfiehlt es sich, das folgende Werkzeug bereitzuhalten:
Dank seines Gewindeprofils und der Länge seines Schafts lassen sich die Fasern des Gewebes durch das Einführen dieses Werkzeugs mittels Drehbewegung in die Bohrung einwickeln und festhalten. Die Entfernung des Tuchstäbchens erfolgt somit, ohne die Innenfläche des Holzes zu beschädigen.
Aufgrund dieser wiederholten Vorfälle haben die Hersteller die Verwendung von Tuchstäbchen mit einer Sicherheitsschnur an beiden Enden (Rückholschnur) zur Regel gemacht, wodurch die Häufigkeit solcher Blockaden verringert wird.
Die Verwendung älterer Modelle ohne diese Sicherheitsvorrichtung birgt jedoch ein hohes Risiko des Verklemmen.
Diese mechanische Situation tritt besonders häufig bei jungen Schülern auf und erfordert ein schnelles Eingreifen des Lehrers, um die Funktionsfähigkeit des Instruments wiederherzustellen.
Fehlt dieses spezielle Werkzeug in einer Notsituation vor einem Auftritt, lässt sich die Blockade durch ein alternatives Verfahren beheben.
Durch die Verwendung der Hauptachse der linken Hand (der Stab, der die H-, A- und G-Klappen trägt) als Druckstift lässt sich der Stoffknoten in den Abschnitt des Rohrs mit größerem Durchmesser zurückschieben. Die Dauer des Vorgangs ist proportional zur Zugkraft, die ursprünglich auf das Tuch ausgeübt wurde.
Nachdem die Achse aus ihrem Mechanismus herausgezogen wurde, wird sie als Schiebestift verwendet. Durch wiederholtes leichtes Klopfen auf das Ende der Achse mit einem Messergriff oder einem kleinen Präzisionshammer wird der Stoffknoten zurückgedrückt und entspannt sich im Inneren des Rohrs. Sobald der Stoff ausreichend zurückgedrückt ist, verwenden Sie einen kleinen Metallhaken, um die Falten des Tuchs nach und nach durch die aufeinanderfolgenden Öffnungen der Tonlöcher herauszuziehen, bis ein ausreichender Halt besteht, um es am unteren Ende des Korpus zu ergreifen. Dieses Vorgehen erfordert eine methodische Ausführung und gleichmäßige Schläge.
Es ist unbedingt darauf zu verzichten, den Stoff gewaltsam in Richtung des oberen Teils (der engsten Stelle der Bohrung) herauszuziehen. Diese Vorgehensweise führt systematisch zu einer endgültigen Blockade. Der radiale Druck, der durch das Zusammendrücken des Textilknotens gegen die Innenwände ausgeübt wird, kann zu einem strukturellen Bruch und zum Bersten des Holzes führen.
Italiano
Rimozione d’emergenza di un tampone incastrato nel foro.
In previsione di questo tipo di incidente domestico, si raccomanda di procurarsi il seguente attrezzo:
Grazie al suo profilo filettato e alla lunghezza del gambo, l’inserimento di questo attrezzo mediante rotazione all’interno del foro consente di avvolgere e agganciare le fibre del tessuto. L’estrazione del tampone avviene così senza danneggiare la superficie interna del legno.
A seguito di questi ripetuti incidenti, i produttori hanno generalizzato l’uso di tamponi dotati di un cordino di sicurezza a ciascuna estremità (cordino di richiamo), il che riduce la frequenza di questi blocchi.
Tuttavia, l’uso di modelli precedenti privi di questa sicurezza comporta un elevato rischio di incastro.
Questa situazione meccanica è particolarmente frequente tra i giovani allievi e richiede un intervento rapido da parte dell’insegnante per ripristinare la funzionalità dello strumento.
In assenza di questo strumento specifico in una situazione di emergenza prima di un’esibizione, una procedura alternativa permette di risolvere l’incastro.
L’uso dell’asse principale della mano sinistra (l’asta che sostiene le chiavi di Si, La e Sol) come spintore permette di spingere il nodo del panno verso la sezione di diametro maggiore del foro. La durata dell’operazione è proporzionale alla forza di trazione inizialmente esercitata sul panno.
Dopo aver estratto l’asse dal suo meccanismo, utilizzarlo come perno di spinta. Esercitando lievi e ripetuti colpi sull’estremità dell’asse mediante il manico di un coltello o un piccolo martello di precisione, il nodo tessile arretra e si allenta all’interno del tubo. Non appena il tessuto è stato sufficientemente spinto indietro, utilizzare un piccolo gancio metallico per estrarre progressivamente le pieghe del panno attraverso i successivi passaggi dei fori di intonazione, fino a quando una presa sufficiente consenta di afferrarlo dall’estremità inferiore del corpo. Questa procedura richiede un’esecuzione metodica e regolarità nei colpi.
È assolutamente necessario evitare qualsiasi tentativo di estrazione forzata del tessuto verso la parte superiore (la sezione più stretta del foro). Questa manipolazione provoca sistematicamente un blocco definitivo. La pressione radiale esercitata dalla compressione del nodo tessile contro le pareti interne può causare una rottura strutturale e la frantumazione del legno.
0 Comments