Les participants à mes stages n’ayant en général que peu de connaissances des mécanismes en jeu dans le fonctionnement d’un hautbois ni de notions de réglage, je commence toujours par poser les bases de l’observation de ces mécanismes par mes maquettes pédagogiques en lego technic.
Ceux d’entre eux qui ont déjà quelques outils pourront les apporter afin d’aider d’autres participants dans leurs exercices.
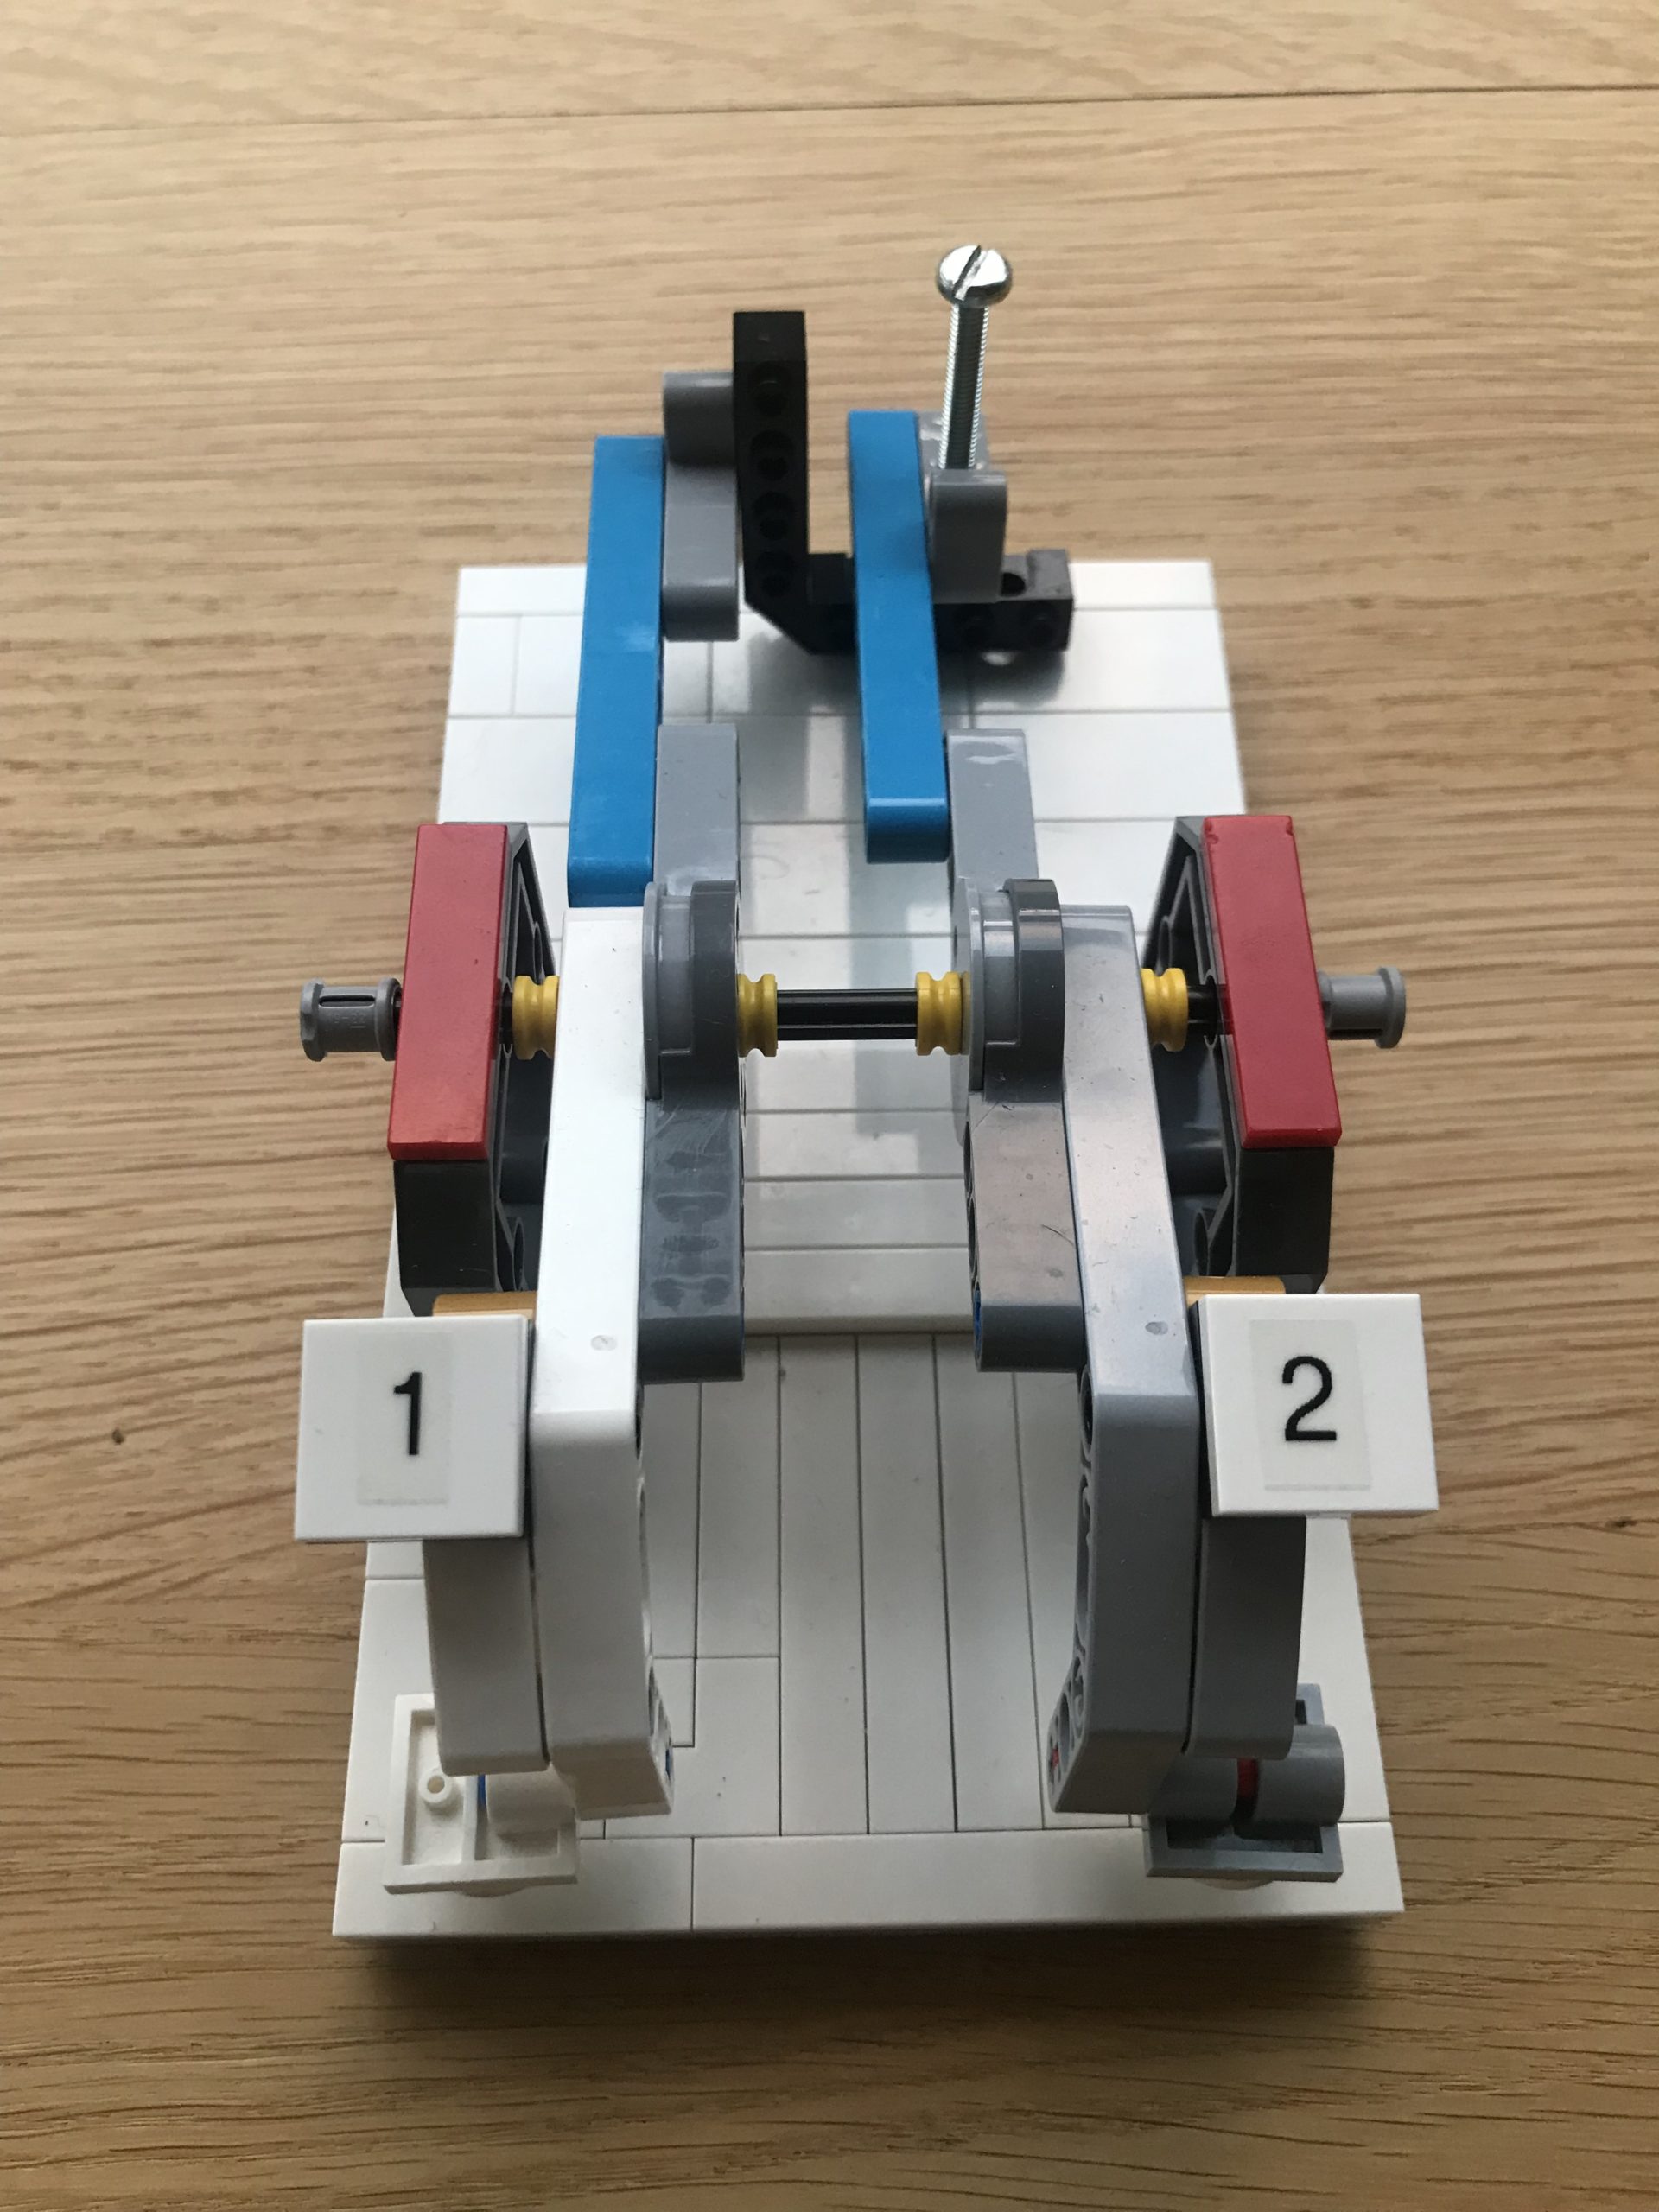 N°1
N°1  N°2
N°2
De par leur taille et la matière même des legos, ces maquettes ont tous les avantages : elles ne sont ni fragiles ni précieuses et elles permettent de visualiser facilement les modifications apportées, de les manipuler ou de corriger nos actions sans aucune peur de faire des erreurs. Ce sont des outils précieux pour ancrer très profondément la compréhension des équilibres et correspondances entre les différents éléments qui entrent en jeu.
9h30 : Ouverture du stage, brève présentation de chaque participant.
9h45 : À l’aide de la maquette (N°1), la notion de bascule et la compréhension du rapport entre une clé et sa voisine sont mis en lumière.
En agissant avec les doigts sur la grosse vis de réglage de cette maquette, il est plus évident de constater quels effets sont ainsi produits sur l’équilibre entre les clés si l’on tourne dans le sens horaire ou anti-horaire. Un boulon et son écrou viennent compléter cette observation de façon très tactile. À ce stade déjà, nous parlerons en terme de minutes, la fente de la vis servant d’aiguille de montre.
10h : Qu’en est-il sur le hautbois? Quelles clés pourraient être les plus représentatives de la situation décrite par cette maquette? Il est temps de tirer des parallèles entre les legos et l’instrument. À l’aide de mon hautbois, le réglage d’un petit défaut de bouchage à main gauche pourra faire l’objet d’observations de terrain.
10h20 : Puis, on passe à la maquette de main gauche (N°2) Il s’agit alors d’observer le chemin qu’empruntent les legos pour embarquer dans leur mouvement d’autres éléments à des distances plus importantes et par des correspondances multiples et plus complexes. Avec le doigt, il est possible d’activer certaines tiges, de les abaisser ou de les soulever manuellement et de comprendre les méandres par lesquelles s’exerce cette mécanique.
10h50 : À nouveau, il est temps de regarder ce qu’il en est sur le hautbois lui-même. Repérons les points de jonction permettant aux clés d’être en relation mutuelle et déterminons une hiérarchie entre elles en vue de l’établissement d’un ordre de priorité essentiel à l’obtention d’un résultat optimal lors du réglage des clés à correspondances multiples (celles de Sol et de Mi, en particulier.) Il y en a d’autres ailleurs, mais le principe étant intégré pour ces deux cas précis, il sera plus facile de le mettre en pratique partout où cela s’avère utile.
LOI DE PRIORITÉ DE RÉGLAGE
Toutes les clés primaires (La, Sol, Fa#, Mi, Ré) ont la priorité sur celle(s) qu’elles entraînent.
Cette loi assure la primeur d’étanchéité sur les clés primaires, soit celles où les doigts se posent.sur des trous Toutes les autres qui en dépendent sont donc indirectes ou secondaires dans l’ordre de priorité de réglage.
Plus on s’éloigne de « l’épicentre » de l’appui plus il faut être prudent avec la fermeté du réglage. Une inversion dans ce protocole peut rendre un réglage totalement impossible, comme de s’évertuer à vouloir fermer une porte en laissant un pied à l’intérieur. La clé de Sol et ses deux cadences activées lorsque l’index droit est posé sur la clé de Sib en est l’exemple le plus probant, tant l’équilibre de la main gauche est essentiel au bon fonctionnement de notre instrument.
11h20 : Chaque instrument présent à l’atelier sera pris en main et passé à la loupe de ce réglage de la main gauche. Ils seront observés selon les deux méthodes possibles, à froid et à chaud. On commence par la première et on contrôle avec la seconde. Chaque participant aura l’opportunité de tester ces méthodes sur son propre instrument pour en contrôler l’efficacité et en faire l’expérience.
12h : La première maquette aura aussi permis de comprendre l’importance du sens de rotation des vis. Partant de l’observation de ces effets, on peut en déduire s’il faut visser (sens horaire) ou dévisser. (sens anti-horaire) en fonction de l’effet désiré. Une observation bien claire du défaut, de sa localisation et du but souhaité permet ainsi de choisir le sens de rotation de la vis. Selon l’ampleur de la fuite et l’endroit où elle se situe, il faudra tourner dans un sens ou dans l’autre de quelques secondes à plusieurs minutes…Sur mon instrument, plusieurs situations problématiques liées à la main gauche seront proposées au diagnostic. Je guide les constats jusqu’à la solution du problème et fais la correction moi-même.
12h30 : Pause repas
14h : Pour débuter l’après-midi, chaque participant peut faire part de ses constats et soucis liés à son instrument. Cela sera alors évalué sous l’angle de notre capacité d’instrumentiste à en trouver la cause et d’en corriger les effets. Quels sont les moyens à notre disposition, les méthodes à notre portée pour circonscrire au plus près les causes d’un dysfonctionnement? Comment localiser avec précision la clé qui coince, poser un diagnostic sûr afin d’éviter toute manutention inutile, voire contre-productive? Chaque cas est instructif.
Certaines « pannes » étant plus fréquentes que d’autres, si cela s’avère utile, je peux à nouveau proposer sur mon propre instrument quelques situations épineuses quoique très peu compliquées à corriger. La recherche de la cause et de l’origine est un exercice passionnant dès lors qu’il est dégagé du stress habituel.
15h : La question de la maintenance peut ici être abordée. L’une des actions les plus utiles consiste à nettoyer nos clés d’octave. De quels outils avons-nous besoin, comment s’y prendre et à quoi faire attention durant ce travail sont les éléments principaux de cet atelier. La taille des orifices des boîtes d’octave n’étant pas la même, attention à ne pas les inverser. Laquelle est la plus grosse? Savoir répondre à cette question permet d’éviter de les intervertir car la différence est visible à l’œil nu.
Quelques tours de main sont expliqués afin d’éviter de blesser l’instrument. En outre, que faire si toute la boîte se dévisse et non seulement la couronne? Comment placer les éléments démontés sur la table, comment graisser la boîte pour éloigner l’eau?
Tous les instruments présents sont nettoyés et préparés pour les mois à venir. Chaque participant devra faire l’acquisition de ces quelques outils en vue d’être autonome le moment venu. Dès que l’eau vient polluer nos octaves et généralement aux changements de saison, il est important de faire le ménage de nos boîtes d’octave.
16h : Une fente ayant un effet souvent pervers et difficile à identifier, d’autres causes sont plutôt suspectées comme les anches ou notre forme du moment. On perd souvent beaucoup de temps à mettre le doigt dessus. Mais, dès qu’elle a été repérée, tout s’éclaire soudain et prend sens.
Encore faut-il pouvoir y remédier en urgence. Comme une fente n’est problématique que parce qu’elle passe par un trou ou une clé d’octave, cela signifie qu’il faut donc étanchéifier cette cheminée, empêcher l’air de fuir sous le tampon. Cependant, il ne faut pas que le remède soit pire que le mal. En comblant la fente de colle, il est indispensable de ne laisser aucune épaisseur à la surface du bois, sous le tampon, sous peine de créer une fuite plus problématique encore. Éliminez donc avec le doigt tout excédent pour laisser lisse la surface du bois à cet endroit précis. Partout ailleurs, un excédent n’est pas un problème, du moins fonctionnellement. Sur le plan esthétique, la chose peut attendre l’intervention du spécialiste.
Si un instrument présent est fendu, ce sera l’occasion de montrer comment s’y prendre pour le rendre jouable.
Oser entreprendre cette réparation peut nous permettre d’honorer un concert en l’absence d’un réparateur, durant un weekend ou des périodes de fête.
Ainsi se termine cette journée de formation.
Un document didactique est remis à chacun en guise d’aide mémoire. Selon les vœux, il peut être en cinq langues européennes, en russe, chinois et japonnais. Cette liste peut être augmentée de toutes les autres langues européennes.
Un certificat est également remis à chacun en souvenir de ce beau moment passé ensemble.
One-day program
As the participants in my courses generally have little knowledge of the mechanisms involved in the functioning of an oboe, nor any notions of tuning, I always start by laying the foundations for observing these mechanisms with my Lego Technic pedagogical models.
Those who already have some tools can bring them along to help other participants in their exercises.
N°1 N°2
Because of their size and the material of Legos themselves, these models have every advantage: they’re neither fragile nor precious, and they make it easy to visualize the changes we’ve made, to manipulate them or to correct our actions without any fear of making mistakes. They are invaluable tools for firmly anchoring our understanding of the balances and correspondences between the various elements involved.
9:30am: Opening of the workshop, brief introduction of each participant.
9.45am: Using the model (N°1), the notion of a seesaw and the understanding of the relationship between a key and its neighbor are highlighted.
By using your fingers to turn the large adjusting screw on this model, it becomes clearer what effects clockwise or counter-clockwise turning has on the balance between the keys. A bolt and nut complete this observation in a very tactile way. At this stage, we’re already talking in terms of minutes, with the screw slot serving as a watch hand.
10 a.m.: What about the oboe? Which keys might be most representative of the situation described by this model? Time to draw parallels between the legos and the instrument. With the help of my oboe, the adjustment of a small clogging defect in the left hand can be the subject of field observations.
10h20: Then we move on to the left-hand model (N°2). The aim is to observe the path taken by the legos to embark in their movement other elements at greater distances and through multiple and more complex correspondences. Using your finger, you can activate certain rods, lowering or raising them manually, and understand the meanders through which these mechanics operate.
10.50: Once again, it’s time to take a look at the oboe itself. Let’s identify the junction points where the keys are in mutual relation, and establish a hierarchy between them, so as to establish an essential order of priority for obtaining optimum results when adjusting keys with multiple correspondences (those of G and E, in particular.) There are others elsewhere, but as the principle has been integrated for these two specific cases, it will be easier to put it into practice wherever it proves useful.
SETTING PRIORITY LAW
All primary keys (A, G, F#, E, D) have priority over the key(s) they drive.
This law ensures that the primary keys, i.e. those where the fingers rest.on the holes, have priority over the others. All the others that depend on it are therefore indirect or secondary in the order of setting priority.
The further you move away from the « epicenter » of support, the more you need to be careful with the firmness of the setting. An inversion in this protocol can make an adjustment totally impossible, like trying to close a door while leaving a foot inside. The key of G, with its two cadences activated when the right index finger is placed on the key of Bb, is the most convincing example of this, so essential is the balance of the left hand to the proper functioning of our instrument.
11.20 a.m.: Each instrument present at the workshop will be taken in hand and put under the magnifying glass of this left-hand adjustment. They will be observed according to the two possible methods, cold and warm. We start with the first and check with the second. Each participant will have the opportunity to test these methods on his or her own instrument, to check their effectiveness and experiment with them.
12pm: The first model will also have helped us understand the importance of the direction of rotation of the screws. By observing these effects, we can deduce whether to screw in (clockwise) or out (anti-clockwise), depending on the desired effect. By clearly observing the defect, its location and the desired effect, you can decide which direction to turn the screw. Depending on the size and location of the leak, you’ll need to turn in one direction or the other, from a few seconds to several minutes… On my instrument, several problem situations related to the left hand will be proposed for diagnosis. I guide the findings to the solution of the problem and make the correction myself.
12:30 pm: Lunch break
2 p.m.: To start the afternoon, each participant can share his or her findings and concerns related to his or her instrument. These will then be assessed in terms of our ability as instrumentalists to find the cause and correct the effects. What means and methods are available to us to pinpoint the causes of a malfunction? How can we pinpoint the key that’s sticking, and make a sound diagnosis to avoid unnecessary or even counter-productive handling? Each case is instructive.
Some « breakdowns » are more frequent than others, so if it’s useful, I can once again propose some thorny situations on my own instrument, even though they’re not very complicated to correct. The search for cause and origin is a fascinating exercise when freed from the usual stress.
3pm: The question of maintenance can now be addressed. One of the most useful actions is to clean our octave keys. What tools we need, how to go about it and what to look out for in the process are the main elements of this workshop. Octave boxes are not the same size, so be careful not to invert them. Which is the biggest? Knowing how to answer this question will help you avoid swapping them, as the difference is visible to the naked eye.
A few tricks of the trade are explained to avoid damaging the instrument. What if the whole case unscrews, not just the crown? How do you place the dismantled parts on the table, and grease the box to keep out water?
All the instruments present are cleaned and prepared for the months ahead. Each participant will need to acquire these few tools in order to be self-sufficient when the time comes. As soon as water pollutes our octaves, and more generally when the seasons change, it’s important to clean out our octave boxes.
4 p.m.: Since a crack often has a perverse effect that is difficult to identify, other causes are more likely to be suspected, such as reeds or our current shape. We often waste a lot of time putting our finger on it. But once it has been identified, everything suddenly becomes clearer and makes sense.
But it’s important to be able to remedy the problem as a matter of urgency. Since a crack is only problematic because it passes through a hole or an octave key, this means that the chimney must be sealed, to prevent air leaking under the plug. But don’t let the cure be worse than the disease. When filling the glue gap, it’s essential not to leave any thickness on the surface of the wood beneath the plug, otherwise you’ll create an even more problematic leak. Eliminate any excess glue with your finger, leaving a smooth wood surface at this point. Everywhere else, excess is not a problem, at least functionally. Aesthetically speaking, it can wait for the specialist’s intervention.
If an existing instrument is cracked, this is an opportunity to demonstrate how to make it playable.
Daring to undertake this repair may enable us to honor a concert in the absence of a repairer, over a weekend or during festive periods.
And so ends this training day. A didactic document is given to each participant as an aide-memoire. Depending on requirements, it can be in five European languages, Russian, Chinese and Japanese. This list can be extended to include all other European languages.
A certificate is also given to everyone as a souvenir of this wonderful time spent together.
Programm eines Praktikumstages
Die Teilnehmer an meinen Kursen haben in der Regel nur geringe Kenntnisse über die Mechanismen, die bei der Funktion einer Oboe eine Rolle spielen, und sie wissen auch nicht, wie man eine Oboe einstellt.
Ich beginne daher immer damit, die Grundlagen für die Beobachtung dieser Mechanismen durch meine pädagogischen Modelle aus Lego Technic zu schaffen.
Diejenigen unter Ihnen, die bereits über einige Werkzeuge verfügen, können diese mitbringen, um anderen Teilnehmern bei ihren Übungen zu helfen.
NR. 1 NR. 2
Aufgrund ihrer Größe und des Materials der Legosteine haben diese Modelle alle Vorteile: Sie sind weder zerbrechlich noch wertvoll und ermöglichen es uns, Änderungen leicht zu erkennen, sie zu manipulieren oder unsere Handlungen zu korrigieren, ohne Angst davor, Fehler zu machen. Sie sind wertvolle Werkzeuge, um das Verständnis der Gleichgewichte und Entsprechungen zwischen den verschiedenen Elementen, die ins Spiel kommen, sehr tief zu verankern.
9.30 Uhr: Eröffnung des Kurses, kurze Vorstellung jedes Teilnehmers.
9.45 Uhr: Anhand des Modells (Nr. 1) wird das Konzept der Wippe und das Verständnis der Beziehung zwischen einem Schlüssel und seinem Nachbarn verdeutlicht.
Wenn Sie mit den Fingern auf die große Stellschraube des Modells einwirken, wird deutlich, welche Auswirkungen es auf das Gleichgewicht zwischen den Schlüsseln hat, wenn Sie im oder gegen den Uhrzeigersinn drehen. Eine Schraube und ihre Mutter vervollständigen diese Beobachtung auf sehr taktile Weise. In diesem Stadium werden wir bereits von Minuten sprechen, da der Schlitz in der Schraube als Uhrzeiger dient.
10.00 Uhr: Was ist mit der Oboe? Welche Klappen könnten die Situation, die durch dieses Modell beschrieben wird, am besten wiedergeben? Es ist an der Zeit, Parallelen zwischen den Legos und dem Instrument zu ziehen. Anhand meiner Oboe kann die Einstellung eines kleinen Verschlussfehlers in der linken Hand in der Praxis beobachtet werden.
10.20 Uhr: Weiter geht es mit dem Modell der linken Hand (Nr. 2). Hier geht es darum, den Weg zu beobachten, den die Legosteine nehmen, um andere Elemente in größeren Entfernungen und über mehrere und komplexere Entsprechungen in ihre Bewegung einzubeziehen. Mit dem Finger können Sie bestimmte Stäbe aktivieren, sie manuell senken oder heben und die Mäander verstehen, durch die diese Mechanik funktioniert.
10.50 Uhr: Wieder ist es an der Zeit, die Oboe selbst zu betrachten. Suchen Sie die Verbindungspunkte, an denen die Klappen miteinander in Beziehung stehen, und legen Sie eine Hierarchie zwischen ihnen fest, um eine Prioritätsreihenfolge zu erstellen, die für die optimale Einstellung der mehrfach übereinstimmenden Klappen (insbesondere G und E) wichtig ist. Es gibt noch andere, aber da das Prinzip in diesen beiden Fällen integriert ist, wird es einfacher sein, es überall dort anzuwenden, wo es nützlich ist.
GESETZ DER EINSTELLUNGSPRIORITÄT
Alle Primärschlüssel (A, G, F#, E, D) haben Vorrang vor dem/den Schlüssel(n), den/die sie ansteuern.
Dieses Gesetz stellt sicher, dass die Primärschlüssel, d.h. die Schlüssel, bei denen die Finger auf den Löchern aufliegen, vorrangig abgedichtet werden Alle anderen, die davon abhängen, sind daher indirekt oder sekundär in der Reihenfolge der Einstellpriorität.
Je weiter man sich vom « Epizentrum » des Drucks entfernt, desto vorsichtiger muss man mit der Härte der Einstellung sein. Eine Umkehrung dieses Protokolls kann eine Einstellung völlig unmöglich machen, so als würde man versuchen, eine Tür zu schließen, während ein Fuß drinnen bleibt. Der G-Schlüssel mit seinen zwei Kadenzen, die aktiviert werden, wenn der rechte Zeigefinger auf dem B-Schlüssel liegt, ist das beste Beispiel dafür, wie wichtig die Balance der linken Hand für das reibungslose Funktionieren unseres Instruments ist.
11.20 Uhr: Jedes Instrument im Workshop wird in die Hand genommen und unter die Lupe genommen, um die Einstellung der linken Hand zu überprüfen. Sie werden nach den beiden möglichen Methoden, kalt und warm, untersucht. Wir beginnen mit der ersten und prüfen mit der zweiten Methode. Jeder Teilnehmer wird die Gelegenheit haben, diese Methoden an seinem eigenen Instrument zu testen, um die Wirksamkeit zu überprüfen und Erfahrungen zu sammeln.
12.00 Uhr: Das erste Modell wird auch die Bedeutung der Drehrichtung der Schrauben verdeutlicht haben. Ausgehend von der Beobachtung dieser Effekte kann man ableiten, ob man im Uhrzeigersinn oder gegen den Uhrzeigersinn schrauben muss, um den gewünschten Effekt zu erzielen. Eine klare Beobachtung des Defekts, seiner Lokalisierung und des gewünschten Ziels ermöglicht die Wahl der Drehrichtung der Schraube. Je nach Größe des Lecks und der Stelle, an der es sich befindet, müssen Sie einige Sekunden bis mehrere Minuten in die eine oder andere Richtung drehen… Auf meinem Instrument werden mehrere problematische Situationen, die mit der linken Hand zusammenhängen, zur Diagnose vorgeschlagen. Ich führe die Befunde bis zur Lösung des Problems und nehme die Korrektur selbst vor.
12.30 Uhr: Mittagspause
14.00 Uhr: Zu Beginn des Nachmittags kann jeder Teilnehmer seine Feststellungen und Sorgen in Bezug auf sein Instrument schildern. Dies wird dann unter dem Gesichtspunkt unserer Fähigkeit als Instrumentalist bewertet, die Ursache zu finden und die Auswirkungen zu korrigieren. Welche Mittel und Methoden stehen uns zur Verfügung, um die Ursachen einer Fehlfunktion so genau wie möglich einzugrenzen? Wie können wir den klemmenden Schlüssel genau lokalisieren und eine sichere Diagnose stellen, um unnötige oder sogar kontraproduktive Eingriffe zu vermeiden? Jeder Fall ist lehrreich.
Da einige « Pannen » häufiger auftreten als andere, kann ich, wenn es sich als nützlich erweist, einige knifflige Situationen, deren Behebung jedoch sehr unkompliziert ist, auf meinem eigenen Instrument vorschlagen. Die Suche nach der Ursache und dem Ursprung ist eine spannende Übung, wenn sie ohne den üblichen Stress erfolgt.
15.00 Uhr: Hier kann die Frage der Wartung angesprochen werden. Eine der nützlichsten Maßnahmen ist die Reinigung unserer Oktavschlüssel. Welche Werkzeuge wir dafür benötigen, wie wir das tun und worauf wir bei dieser Arbeit achten müssen, sind die Hauptbestandteile dieses Workshops. Da die Oktavboxen unterschiedlich groß sind, achten Sie darauf, sie nicht zu vertauschen. Welche ist größer? Wenn Sie diese Frage beantworten können, können Sie vermeiden, die Oktavboxen zu vertauschen, da der Unterschied mit dem bloßen Auge sichtbar ist.
Es werden einige Handgriffe erklärt, um Verletzungen des Instruments zu vermeiden. Was ist außerdem zu tun, wenn sich das gesamte Gehäuse und nicht nur die Krone abschrauben lässt? Wie legt man die zerlegten Teile auf den Tisch, wie schmiert man den Kasten, um das Wasser abzuhalten?
Alle vorhandenen Instrumente werden gereinigt und für die kommenden Monate vorbereitet. Jeder Teilnehmer sollte sich diese Werkzeuge aneignen, um zu gegebener Zeit selbständig zu sein. Sobald Wasser unsere Oktaven verschmutzt, und vor allem beim Wechsel der Jahreszeiten, ist es wichtig, unsere Oktavenkästen zu reinigen.
16.00 Uhr: Da ein Spalt oft einen perversen Effekt hat und schwer zu identifizieren ist, werden andere Ursachen vermutet, wie z.B. die Rohrblätter oder unsere momentane Form. Oft wird viel Zeit damit verschwendet, den Finger darauf zu legen. Sobald sie jedoch gefunden wird, ist plötzlich alles klar und macht Sinn.
Allerdings ist es auch wichtig, dass Sie es schnell beheben können. Da ein Schlitz nur dann ein Problem darstellt, wenn er durch ein Loch oder eine Oktavklappe verläuft, bedeutet dies, dass der Schornstein abgedichtet werden muss, damit die Luft nicht unter dem Puffer entweichen kann. Das Heilmittel darf jedoch nicht schlimmer sein als das Übel. Beim Auffüllen des Leimspaltes ist es wichtig, dass Sie keine Dicke auf der Holzoberfläche unter dem Dübel hinterlassen, da sonst ein noch problematischeres Leck entstehen kann. Entfernen Sie also mit dem Finger alle Überstände, damit die Holzoberfläche an dieser Stelle glatt bleibt. An allen anderen Stellen ist ein Überschuss kein Problem, zumindest nicht funktional. In ästhetischer Hinsicht kann die Sache warten, bis ein Fachmann eingreift.
Wenn ein vorhandenes Instrument einen Riss hat, ist dies eine gute Gelegenheit zu zeigen, wie man es wieder spielbar macht.
Der Mut, eine solche Reparatur vorzunehmen, kann es uns ermöglichen, ein Konzert zu geben, wenn kein Reparaturdienst anwesend ist, an einem Wochenende oder zu Feiertagen.
Damit endete dieser Schulungstag. Jeder erhält ein didaktisches Dokument als Gedächtnisstütze. Je nach Wunsch kann es in fünf europäischen Sprachen, in Russisch, Chinesisch und Japanisch vorliegen. Diese Liste kann um alle anderen europäischen Sprachen erweitert werden.
Jeder erhält ein Zertifikat als Andenken an diese schöne gemeinsame Zeit.
Programma di un giorno di corso
Poiché i partecipanti ai miei corsi hanno generalmente una scarsa conoscenza dei meccanismi coinvolti nel funzionamento di un oboe, o di qualsiasi nozione di accordatura, inizio sempre gettando le basi per l’osservazione di questi meccanismi utilizzando i miei modelli didattici Lego Technic.
Chi ha già degli strumenti può portarli con sé per aiutare gli altri partecipanti nei loro sforzi.
N°1 N°2
Grazie alle loro dimensioni e al materiale dei Lego stessi, questi modelli hanno tutti i vantaggi: non sono né fragili né preziosi, e permettono di visualizzare facilmente le modifiche apportate, di manipolarli o di correggere le nostre azioni senza paura di sbagliare. Sono strumenti preziosi per stabilire con certezza una comprensione degli equilibri e delle relazioni tra i diversi elementi coinvolti.
9.30: Apertura del workshop, breve presentazione di ogni partecipante.
9.45: Utilizzando il modello (n. 1), si evidenzia la nozione di altalena e la comprensione del rapporto tra un tasto e il suo vicino.
Utilizzando le dita per girare la grande vite di regolazione su questo modello, è più facile vedere gli effetti sull’equilibrio tra i tasti quando vengono girati in senso orario o antiorario. Un bullone e il suo dado completano questa osservazione in modo molto tattile. A questo punto, stiamo già parlando in termini di minuti, con la fessura nel bullone che funge da lancetta dell’orologio.
10am: E l’oboe? Quali tasti potrebbero essere i più rappresentativi della situazione descritta da questo modello? È il momento di fare un parallelo tra i lego e lo strumento. Con l’aiuto del mio oboe, la regolazione di un piccolo difetto di intasamento nella mano sinistra può essere oggetto di osservazioni sul campo.
10:20: Poi passiamo al modello della mano sinistra (n. 2). L’idea è di osservare il percorso compiuto dai lego per incorporare altri elementi nel loro movimento a distanze maggiori e attraverso corrispondenze multiple e più complesse. Può utilizzare il dito per attivare determinate aste, abbassandole o alzandole manualmente, e comprendere le complessità della meccanica coinvolta.
10:50: Ancora una volta, è il momento di dare un’occhiata all’oboe stesso. Troviamo i punti di giunzione in cui i tasti si relazionano tra loro e stabiliamo una gerarchia tra di loro, per stabilire un ordine di priorità che è essenziale per ottenere il miglior risultato possibile quando si regolano i tasti con corrispondenze multiple (quelli di Sol ed E, in particolare).
LEGGE DELLA PRIORITÀ DI SINTONIZZAZIONE
Tutte le chiavi primarie (La, Sol, Fa#, Mi, Re) hanno la priorità sulla chiave(i) che guidano.
Questa legge assicura che i tasti primari, cioè quelli in cui le dita poggiano sui fori, siano i primi ad essere a tenuta stagna.
Più ci si allontana dall »epicentro’ della pressione, più bisogna fare attenzione alla fermezza dell’impostazione. Un’inversione in questo protocollo può rendere una regolazione completamente impossibile, come cercare di chiudere una porta lasciando un piede all’interno. La chiave di Sol e le sue due cadenze attivate quando l’indice destro viene posizionato sulla chiave di Sib è l’esempio più convincente, tanto è essenziale l’equilibrio della mano sinistra per il corretto funzionamento del nostro strumento.
11:20: Ogni strumento presente al workshop sarà preso in mano e messo sotto la lente di ingrandimento di questa regolazione della mano sinistra. Saranno osservati con i due metodi possibili, a freddo e a caldo. Inizieremo con il primo e controlleremo con il secondo. Ogni partecipante avrà l’opportunità di testare questi metodi sul proprio strumento per verificarne l’efficacia e acquisire esperienza.
12.00: Il primo modello ci avrà anche aiutato a capire l’importanza della direzione di rotazione delle viti. Osservando questi effetti, possiamo dedurre se avvitare all’interno (in senso orario) o all’esterno (in senso antiorario) a seconda dell’effetto desiderato. Osservando chiaramente il difetto, la sua posizione e l’effetto desiderato, è possibile scegliere la direzione di rotazione della vite. A seconda dell’entità della perdita e della sua posizione, sarà necessario ruotare in una direzione o nell’altra da pochi secondi a diversi minuti… Sul mio strumento, verranno proposte per la diagnosi diverse situazioni problematiche legate alla mano sinistra. Io guido le osservazioni alla soluzione del problema ed eseguo personalmente la correzione.
12.30: Pausa pranzo
14.00: Per iniziare il pomeriggio, ogni partecipante può condividere le proprie osservazioni e preoccupazioni sul suo strumento. Questo verrà poi valutato dal punto di vista della nostra capacità come strumentisti di trovare la causa e correggere gli effetti. Quali mezzi e metodi abbiamo a disposizione per individuare le cause di un malfunzionamento? Come possiamo individuare la chiave che si blocca, fare una diagnosi corretta ed evitare una manipolazione inutile o addirittura controproducente? Ogni caso è istruttivo.
Alcuni ‘guasti’ sono più frequenti di altri, quindi se è utile farlo, posso suggerire ancora una volta alcune situazioni spinose del mio strumento, anche se non sono molto complicate da correggere. La ricerca della causa e dell’origine è un esercizio affascinante, purché sia privo del solito stress.
Ore 15.00: Si può ora affrontare la questione della manutenzione. Una delle azioni più utili è la pulizia delle chiavi d’ottava. Quali sono gli strumenti necessari, come procedere e a cosa prestare attenzione durante questo lavoro sono gli elementi principali di questo workshop. Le scatole d’ottava non sono della stessa dimensione, quindi faccia attenzione a non invertirle. Qual è la più grande? Se conosce la risposta a questa domanda, potrà evitare di scambiarle, perché la differenza è visibile a occhio nudo.
Vengono spiegati alcuni trucchi per evitare di danneggiare lo strumento. Cosa fare se si svita l’intera cassa, non solo la corona? Come si posizionano le parti smontate sul tavolo e come si ingrassa la cassa per tenere lontana l’acqua?
Tutti gli strumenti presenti vengono puliti e preparati per i prossimi mesi. Ogni partecipante dovrà acquisire questi pochi strumenti per essere autonomo quando sarà il momento. Non appena l’acqua inquina le nostre ottave, e più in generale quando le stagioni cambiano, è importante pulire le nostre casse d’ottava.
Ore 16.00: Poiché una crepa ha spesso un effetto perverso difficile da identificare, è più probabile sospettare altre cause, come le canne o la nostra forma attuale. Spesso ci vuole molto tempo per individuare la causa. Ma una volta identificata, tutto diventa improvvisamente più chiaro e ha senso.
Ma bisogna essere in grado di intervenire con urgenza. Poiché una crepa è problematica solo perché passa attraverso un foro o una chiave di ottava, ciò significa che il camino deve essere sigillato, per evitare che l’aria fuoriesca sotto il tappo. Tuttavia, la cura non deve essere peggiore della malattia. Quando riempie la fessura di colla, è essenziale non lasciare alcuno spessore sulla superficie del legno, sotto il tappo, altrimenti si creerà una perdita ancora più problematica. Utilizzi quindi il dito per rimuovere qualsiasi eccesso, lasciando la superficie del legno liscia in questa particolare area. In tutti gli altri punti, un eccesso non è un problema, almeno dal punto di vista funzionale. Dal punto di vista estetico, la questione può attendere l’intervento dello specialista.
Se uno strumento è incrinato, questa è l’occasione per mostrare come renderlo suonabile.
Osare questa riparazione può permetterci di onorare un concerto in assenza di un riparatore, durante un fine settimana o nei periodi di festa.
E così si conclude questa giornata di formazione. Ad ogni partecipante è stato consegnato un documento di istruzioni come aiuto-memoria. A seconda dei desideri dei partecipanti, può essere redatto in cinque lingue europee, in russo, cinese e giapponese. Questo elenco può essere ampliato per includere tutte le altre lingue europee.
A tutti viene anche consegnato un certificato come ricordo di questo bellissimo momento trascorso insieme.
0 commentaires