
Les participants à cette formation ne disposant généralement pas de larges compétences préalables en mécanique instrumentale ou en micro-réglage, l’apprentissage débute par l’étude des mécanismes fondamentaux à l’aide de maquettes pédagogiques conçues en composants Lego Technic.
L’utilisation de l’outillage personnel par les participants possédant déjà un équipement propre est encouragée afin de faciliter les travaux pratiques collectifs
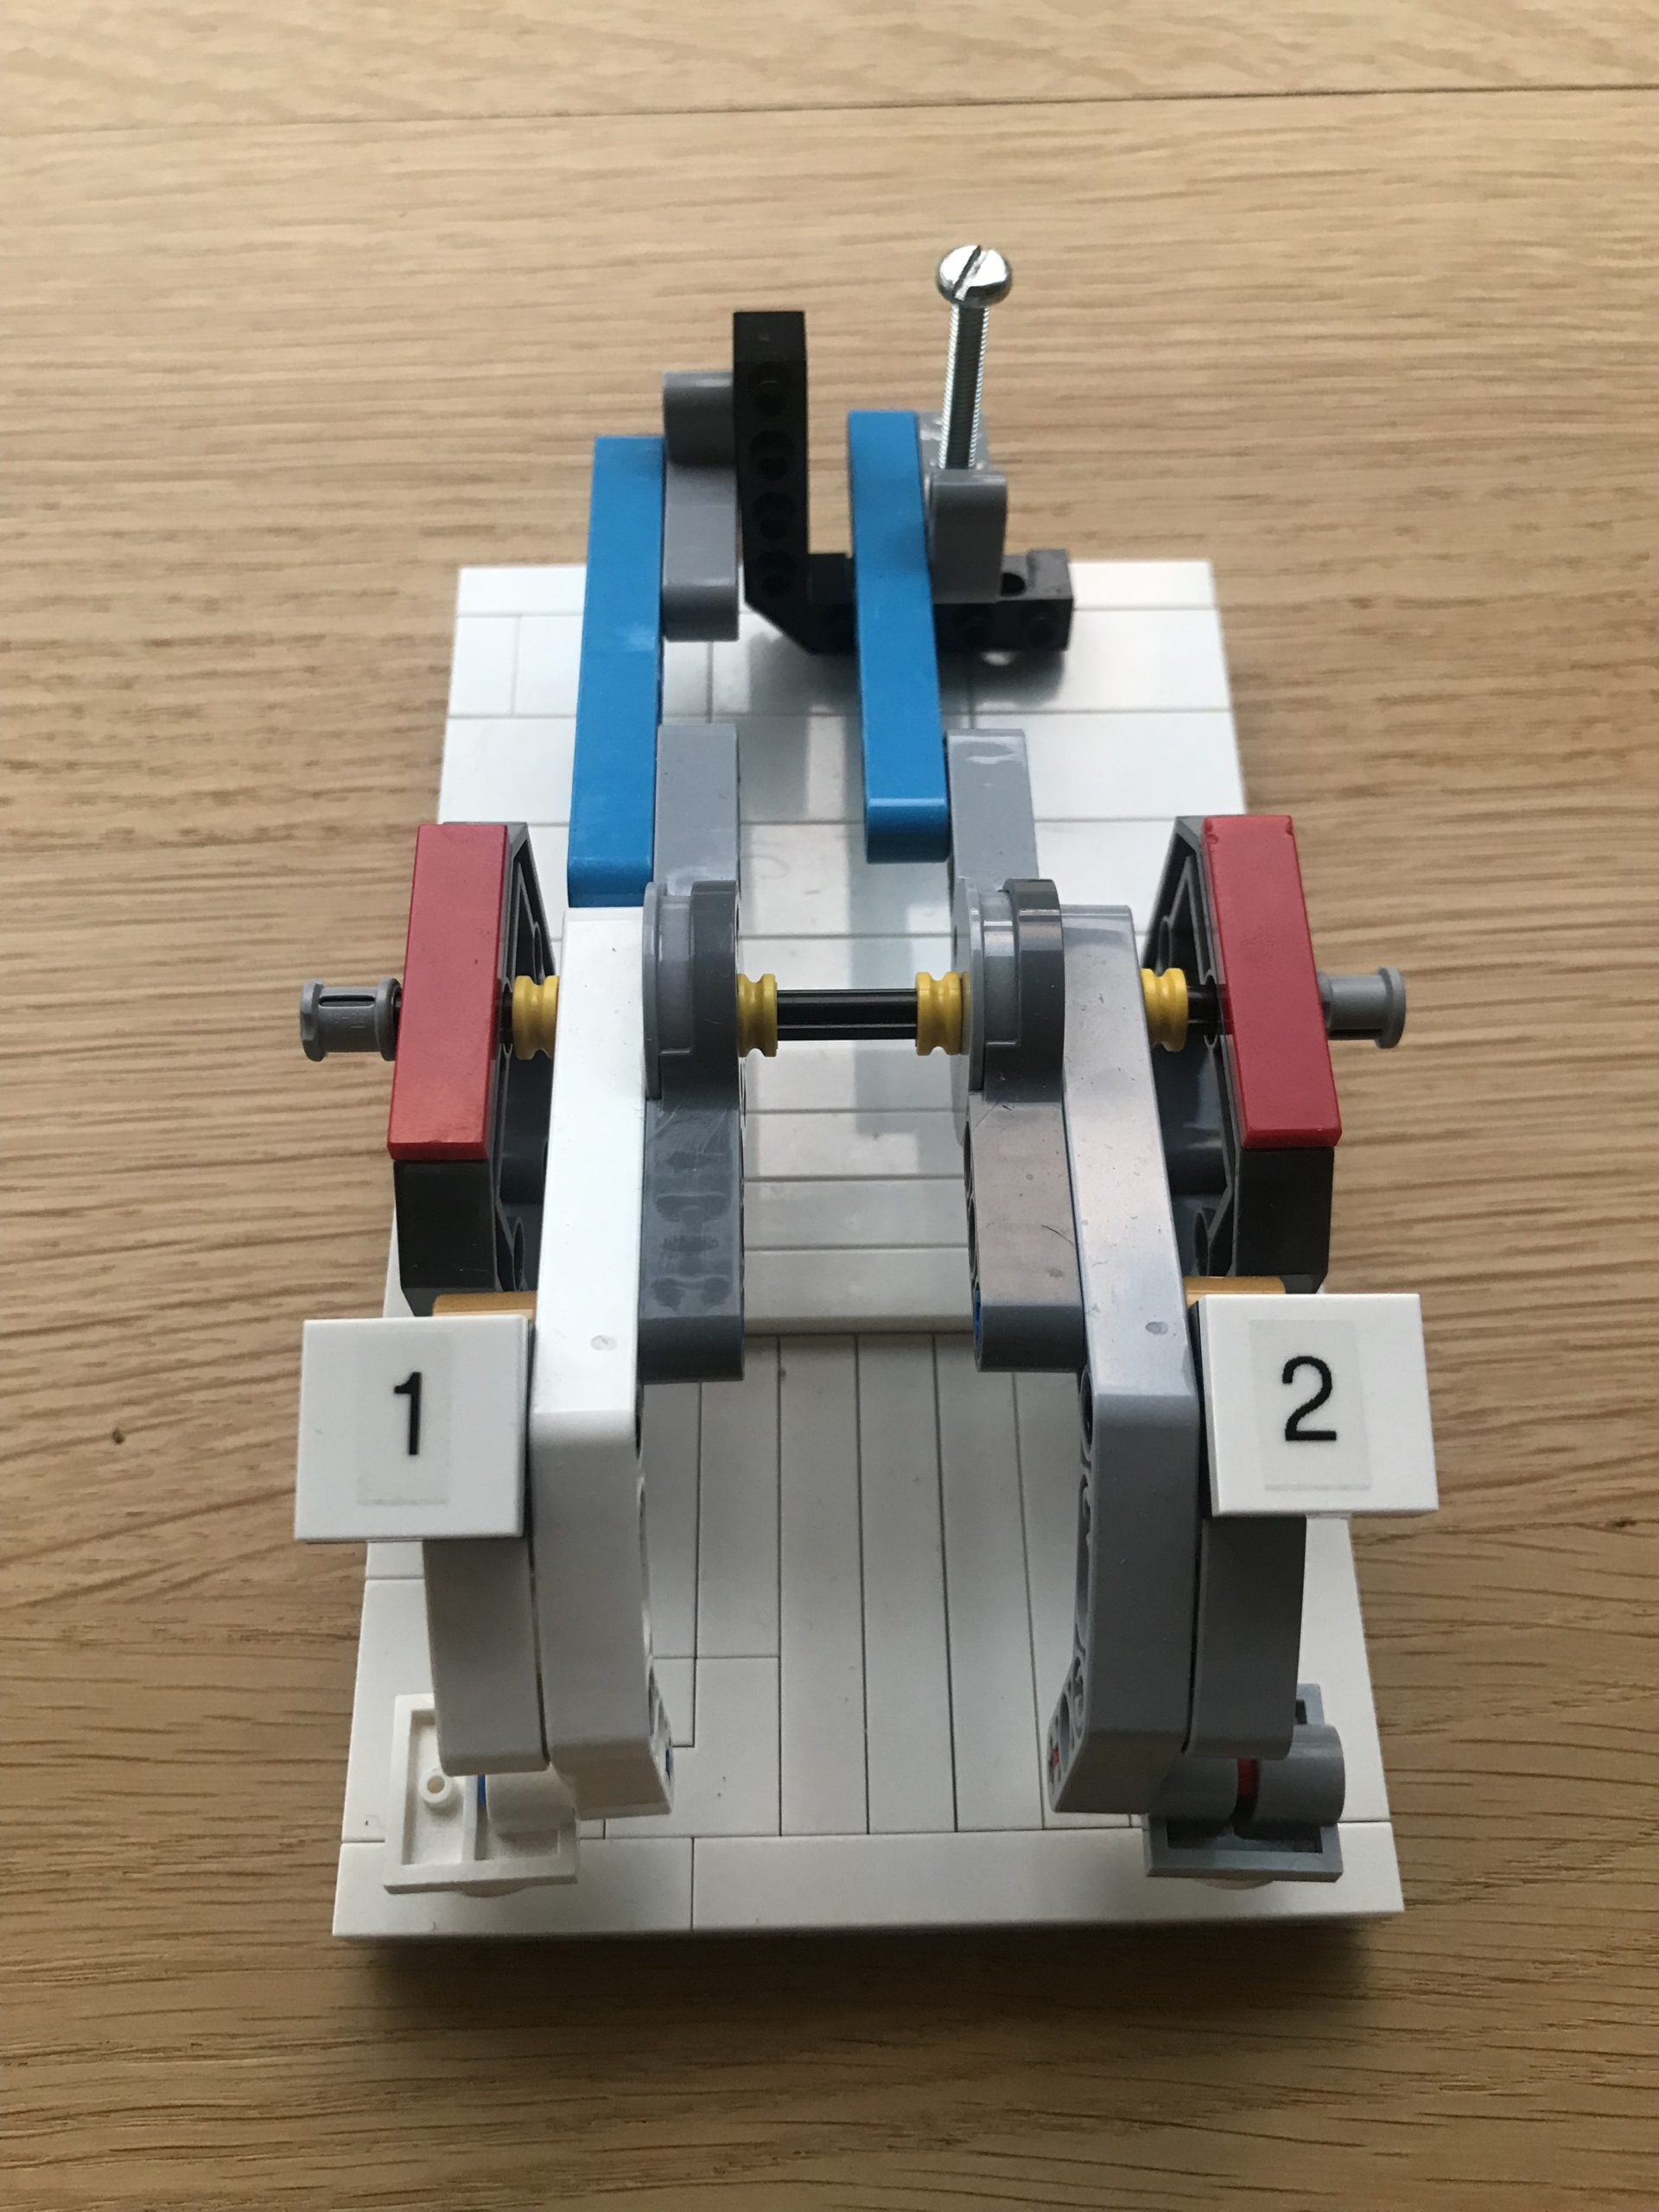 N°1
 N°2
Toutes les clés primaires (La, Sol, Fa#, Mi, Ré) sont prioritaires sur les clés esclaves qu’elles entraînent.
English
Typical One-Day Training Program.
Since participants in this training generally have no prior experience in instrument mechanics or fine-tuning, the course begins with a study of fundamental mechanisms using educational models built with Lego Technic components. Participants who already own their own tools are encouraged to bring them to facilitate group hands-on activities (Model N°1 and Model N°2).
N°1 N°2
Due to their dimensions and the properties of the materials used, these educational models offer high mechanical strength and have no historical value. They allow for immediate visual observation of geometric changes, hands-on manipulation, and the freedom to make technical errors during the adjustment phases. These devices serve as modeling tools to help participants grasp the principles of equilibrium and correspondence in the instrument’s kinematic chains.
- 9:30 a.m.:Opening of the training session and brief introduction of the participants.
- 9:45 a.m.:Analysis of the rocking principle and the interaction between two adjacent keys using Model No. 1. Manually turning the model’s main regulation screw allows participants to visualize the impact of clockwise or counterclockwise rotation on the balance of forces between the keys. A bolt-and-nut assembly complements this model to provide a hands-on understanding of mechanical clearances (end play). At this stage, adjustment changes are quantified using the clock-face reference system, with the screw slot serving as the reference index.
- 10:00 a.m.:Application of mechanical principles to the oboe and identification of the instrument’s keys corresponding to the configuration of Model No. 1. Direct observation of a minor leak in the upper joint mechanism is conducted on a demonstration instrument to simulate real-world conditions.
- 10:20 a.m.:Analysis of the upper joint model (No. 2). The objective is to observe the transmission of motion over distance through multiple correspondences and complex kinematic linkages. Manually operating the rods helps illustrate the lifting and closing trajectories of the various components.
- 10:50 a.m.:Identification on the oboe of the connection points ensuring mechanical interaction between the keys. Establishment of the hierarchy of forces to define the order of priority essential for adjusting mechanisms with multiple correspondences (particularly for the G and E groups). Understanding this principle as applied to these two specific groups allows for its systematic application to all similar mechanisms on the instrument.
LAW OF ADJUSTMENT PRIORITY
All primary keys (A, G, F#, E, D) take precedence over the driven keys they control. This mechanical rule ensures that the primary keys—that is, the keys directly covered by the musician’s fingers—seal perfectly on their tone holes. The dependent components are referred to as indirect or secondary keys in the adjustment sequence. The tightness of the adjustment must decrease as one moves away from the initial pivot point. Reversing this method prevents the upstream keys from closing completely. The interaction between the G key and its two trill keys when the right index finger activates the Bb key is a classic example of this dependency, as the balance of the upper joint mechanism is required for the air column to function properly.
- 11:20 a.m.:Individual technical inspection of each instrument present in the workshop, focusing on upper joint adjustment. The evaluation is conducted using two methods: the “cold” test (visual inspection and cigarette-paper tension test) and the “hot” test (acoustic evaluation while playing). Participants’ practical application of these two methods on their own instruments validates their effectiveness in real-world conditions.
- 12:00 p.m.:Use of the first instructional model to determine the direction of rotation for the regulation screws. Observing the mechanical effects allows participants to determine whether to tighten (clockwise) or loosen (counterclockwise) the screws, depending on the desired alignment. The choice of rotation direction depends on identifying the defect, its location, and the targeted correction. Depending on the severity of the air leak, the adjustment ranges from a few fractions of a turn to several « minutes » of rotation on the clock face. Several simulated malfunctions on the upper joint section are performed on the demonstration instrument for diagnostic practice, with the final correction carried out by the instructor.
- 12:30 p.m.:Lunch break.
- 2:00 p.m.:Collection and analysis of specific technical issues encountered by participants on their respective instruments. The evaluation is conducted from the perspective of the player’s diagnostic skills. Emphasis is placed on methods for isolating mechanical malfunctions in order to precisely locate the defective key, establish a reliable diagnosis, and avoid erroneous or counterproductive interventions. Several complex but easily resolvable scenarios are created on the demonstration instrument to develop troubleshooting skills, without time constraints.
- 3:00 p.m.:Hands-on workshop dedicated to preventive maintenance, focusing on cleaning the inserts and caps of the octave vents. Determination of the required tools, work protocol, and technical points to watch for. Since the diameters of the holes in the first- and second-octave inserts are distinct and distinguishable to the naked eye, a preliminary visual inspection is required to prevent any mix-ups during reassembly. Demonstration of technical techniques to prevent physical damage to the wood or keywork. Review of specific procedures in the event that the entire octave vent insert is accidentally unscrewed rather than just the cap; methods for positioning disassembled components on the workbench; and application of silicone grease to prevent condensation buildup. Thorough cleaning of all participants’ instruments. Acquiring this specialized toolkit is required to ensure the musician’s autonomy during seasonal maintenance or in the event of waterlogging in the octave keys.
- 4:00 p.m.:Study of the diagnosis and emergency treatment of cracks in the wooden joints. A crack causes air leaks that are difficult to identify, and whose symptoms are often mistaken for a problem with the reed or the reed receiver. Emergency repair requires restoring the seal of the tone hole or the octave vent through which the crack passes to ensure the pad sits securely and airtight. Applying liquid adhesive to the crack must not create any excess thickness on the surface of the tone hole seatbeneath the pad, as this could cause a leak worse than the original crack. Any excess liquid adhesive must be manually smoothed away to preserve the flatness of the wood in that area. Excess material located outside the seating areas does not affect functionality, and cosmetic treatment can be postponed. If a present instrument has a crack, it serves as a demonstration model for sealing to restore temporary playability when specialized workshops are unavailable.
- 5:00 p.m.:End of the training day.
Each participant is provided with a summary handout as a reference guide. Depending on individual preferences, this handout can be printed in five European languages, as well as in Russian, Chinese, and Japanese. This list of translations can be expanded, upon request, to include all other European languages. A certificate is also awarded to each participant at the conclusion of this training day.
Due to their dimensions and the properties of the materials used, these educational models offer high mechanical strength and have no historical value. They allow for immediate visual observation of geometric changes, hands-on manipulation, and the freedom to make technical errors during the adjustment phases. These devices serve as modeling tools to help participants grasp the principles of equilibrium and correspondence in the instrument’s kinematic chains.
9:30 a.m.: Opening of the training session and brief introduction of the participants.
9:45 a.m.: Analysis of the rocking principle and the interaction between two adjacent keys using Model No. 1. Manually turning the model’s main adjustment screw allows participants to visualize the impact of clockwise or counterclockwise rotation on the balance of forces between the keys. A bolt-and-nut assembly complements this model to provide a hands-on understanding of mechanical clearances. At this stage, adjustment changes are quantified using the clock-face reference system, with the screw slot serving as the reference index.
10:00 a.m.: Application of mechanical principles to the oboe and identification of the instrument’s keys corresponding to the configuration of Model No. 1. Direct observation of a minor leak in the left-hand section is conducted on a demonstration instrument to simulate real-world conditions.
10:20 a.m.: Analysis of the left-hand model (No. 2). The objective is to observe the transmission of motion over distance through multiple correspondences and complex kinematic linkages. Manually operating the rods helps illustrate the lifting and closing trajectories of the various components.
10:50 a.m.: Identification on the oboe of the connection points ensuring mechanical interaction between the keys. Establishment of the hierarchy of forces to define the order of priority essential for adjusting mechanisms with multiple correspondences (particularly for the G and E groups). Understanding this principle as applied to these two specific groups allows for its systematic application to all similar mechanisms on the instrument.
LAW OF ADJUSTMENT PRIORITY
All primary keys (A, G, F#, E, D) take precedence over the slave keys they drive. This mechanical rule ensures that the primary keys—that is, the keys directly covered by the musician’s fingers—seal perfectly. The dependent components are referred to as indirect or secondary keys in the adjustment sequence. The tightness of the adjustment must decrease as one moves away from the initial pivot point. Reversing this method prevents the upstream keys from closing completely. The interaction between the G key and its two cadences when the right index finger activates the B-flat key is a classic example of this dependency, as the balance of the left hand is required for the air column to function properly.
11:20 a.m.: Individual technical inspection of each instrument present in the workshop, focusing on left-hand adjustment. The evaluation is conducted using two methods: the “cold” test (visual inspection and cigarette-paper tension test) and the “hot” test (acoustic evaluation while playing). Participants’ practical application of these two methods on their own instruments validates their effectiveness in real-world conditions.
12:00 p.m.: Use of the first instructional model to determine the direction of rotation for the adjustment screws. Observing the mechanical effects allows participants to determine whether to tighten (clockwise) or loosen (counterclockwise) the screws, depending on the desired alignment. The choice of rotation direction depends on identifying the defect, its location, and the targeted correction. Depending on the severity of the air leak, the adjustment ranges from a few fractions of a turn to several minutes of rotation. Several simulated malfunctions on the left-hand section are performed on the demonstration instrument for diagnostic practice, with the final correction carried out by the instructor.
12:30 p.m.: Lunch break.
2:00 p.m.: Collection and analysis of specific technical issues encountered by participants on their respective instruments. The evaluation is conducted from the perspective of the player’s diagnostic skills. Emphasis is placed on methods for isolating mechanical malfunctions in order to precisely locate the defective key, establish a reliable diagnosis, and avoid erroneous or counterproductive interventions. Several complex but easily resolvable scenarios are created on the demonstration instrument to develop troubleshooting skills, without time constraints.
3:00 PM: Hands-on workshop dedicated to preventive maintenance, focusing on cleaning the inserts and caps of the octave keys. Determination of the required tools, work protocol, and technical points to watch for. Since the diameters of the holes in the first- and second-octave inserts are distinct and distinguishable to the naked eye, a preliminary visual inspection is required to prevent any mix-ups during reassembly. Demonstration of technical techniques to prevent physical damage to the wood or keywork. Review of specific procedures in the event that the entire insert (chimney) is unscrewed rather than just the ring; methods for positioning disassembled components on the workbench; and application of silicone grease to prevent condensation buildup. Thorough cleaning of all participants’ instruments. Acquiring this specialized toolkit is required to ensure the musician’s autonomy during seasonal maintenance or in the event of waterlogging in the octave keys.
4:00 PM: Study of the diagnosis and emergency treatment of cracks in the wooden body. A crack causes air leaks that are difficult to identify, and whose symptoms are often mistaken for a problem with the reed or mouthpiece. Emergency repair requires restoring the seal of the sound hole or the octave insert through which the crack passes to ensure the pad sits securely and airtight. Applying liquid adhesive to the crack must not create any excess thickness on the surface of the tone hole beneath the pad, as this could cause a leak worse than the original crack. Any excess liquid adhesive must be manually smoothed away to preserve the flatness of the wood in that area. Excess material located outside the seating areas does not affect functionality, and cosmetic treatment can be postponed. If a present instrument has a crack, it serves as a demonstration model for sealing to restore temporary playability when specialized workshops are unavailable.
7:30 PM: End of the training day.
Each participant is provided with a summary handout as a reference guide. Depending on individual preferences, this handout can be printed in five European languages, as well as in Russian, Chinese, and Japanese. This list of translations can be expanded, upon request, to include all other European languages. A certificate is also awarded to each participant at the conclusion of this training day.
Deutsch
N°1 N°2DAS GESETZ DER JUSTIERUNGS-PRIORITÄTAlle Hauptklappen (A, G, Fis, E, D) haben Vorrang vor den von ihnen mitgenommenen (gekoppelten) Nebenklappen.Diese mechanische Grundregel gewährleistet die einwandfreie Dichtigkeit der Hauptklappen – also jener Klappen, die direkt von unseren Fingern geschlossen werden. Die mechanisch mitgeführten Klappen werden in der Justierungsreihenfolge als indirekte oder sekundäre Klappen bezeichnet. Die Straffheit der Einstellung muss abnehmen, je weiter man sich vom ursprünglichen Druckpunkt entfernt. Eine Umkehrung dieser Vorgehensweise verhindert das vollständige Schließen der vorgelagerten Klappen. Das Zusammenspiel zwischen der G-Klappe und ihren beiden Trillerklappen beim Drücken der B-Klappe mit dem rechten Zeigefinger ist das Paradebeispiel für diese Abhängigkeit, da das Gleichgewicht der linken Hand für die gesamte Ansprache des Instruments und die Führung der Luftsäule unerlässlich ist.
Aushändigung eines zusammenfassenden Handouts an alle Teilnehmenden als Gedächtnisstütze. Je nach individuellem Wunsch ist diese Unterlage in fünf europäischen Sprachen sowie auf Russisch, Chinesisch und Japanisch erhältlich; auf Anfrage kann dieses Angebot auf alle weiteren europäischen Sprachen ausgeweitet werden. Zum Abschluss des Workshop-Tages erhält jede teilnehmende Person zudem ein Teilnahmezertifikat.
Italiano
- Ore 09:30: Apertura della sessione di formazione e breve presentazione dei partecipanti.
- Ore 09:45: Analisi del principio di bilanciamento e dell’interazione tra due chiavi adiacenti mediante il modello n. 1. L’azionamento manuale della vite di regolazione principale del modello consente di visualizzare l’impatto di una rotazione in senso orario o antiorario sull’equilibrio delle forze tra le chiavi. Un gruppo bullone e dado completa questa modellizzazione per un approccio tattile ai giochi meccanici. A questo punto, le modifiche di regolazione vengono quantificate secondo il sistema di riferimento orario, con il taglio della vite che funge da indice di riferimento.
- Ore 10:00: Trasposizione dei principi meccanici sull’oboe e identificazione delle chiavi dello strumento che corrispondono alla configurazione del modello n. 1. L’osservazione diretta di un lieve difetto di tenuta sulla sezione della mano sinistra viene effettuata su uno strumento dimostrativo per un’applicazione in condizioni reali.
- Ore 10:20: Analisi del modello della mano sinistra (n. 2). L’obiettivo è osservare la trasmissione del movimento a distanza attraverso corrispondenze multiple e collegamenti cinematici complessi. L’azionamento manuale dei perni permette di comprendere le traiettorie di sollevamento e chiusura dei diversi elementi.
- Ore 10:50: Identificazione sull’oboe dei punti di giunzione che assicurano l’interazione meccanica tra le chiavi. Definizione della gerarchia delle forze al fine di stabilire l’ordine di priorità indispensabile per la regolazione dei meccanismi a corrispondenze multiple (in particolare per i gruppi Sol e Mi). L’assimilazione del principio su questi due gruppi specifici ne consente l’applicazione sistematica a tutti i meccanismi simili dello strumento.
LEGGE DI PRIORITÀ DI REGOLAZIONE
Tutte le chiavi primarie (La, Sol, Fa#, Mi, Re) hanno la priorità sulle chiavi secondarie che azionano. Questa regola meccanica garantisce la perfetta tenuta delle chiavi primarie, ovvero quelle chiuse direttamente dalle dita del musicista. I componenti dipendenti sono definiti chiavi indirette o secondarie nell’ordine di regolazione. La forza di regolazione deve diminuire man mano che ci si allontana dal punto di appoggio iniziale. Un’inversione di questo metodo impedisce la chiusura completa delle chiavi a monte. L’interazione tra la chiave di Sol e le sue due punte di collegamento (rinvii) quando si aziona l’indice destro sulla chiave di Sib costituisce l’esempio tipico di questa dipendenza, essendo necessario l’equilibrio della mano sinistra per il funzionamento della colonna d’aria.
- Ore 11:20: Controllo tecnico individuale di ogni strumento presente al workshop, incentrato sulla regolazione della mano sinistra. La valutazione avviene secondo due metodi: il controllo a freddo (ispezione visiva e prova di trazione con cartina per sigarette) e il controllo a caldo (valutazione acustica durante l’esecuzione). L’applicazione pratica di questi due metodi da parte dei partecipanti sul proprio strumento permette di verificarne l’efficacia sul campo.
- Ore 12:00: Utilizzo del primo modello didattico per determinare il senso di rotazione delle viti di regolazione. L’osservazione degli effetti meccanici permette di dedurre la necessità di avvitare (in senso orario) o di allentare (in senso antiorario) a seconda dell’obiettivo di allineamento desiderato. La scelta del senso di rotazione deriva dall’identificazione del difetto, dalla sua localizzazione e dalla correzione mirata. A seconda dell’entità dello sfiato d’aria, la regolazione varia da poche frazioni di giro a diversi minuti di rotazione. Vengono effettuate diverse simulazioni di guasti sulla sezione della mano sinistra dello strumento dimostrativo come esercizio di diagnosi, mentre la correzione finale viene eseguita dal formatore.
- Ore 12:30: Pausa pranzo.
- Ore 14:00: Raccolta e analisi delle problematiche tecniche specifiche riscontrate dai partecipanti sui rispettivi strumenti. La valutazione viene condotta dal punto di vista delle capacità diagnostiche dello strumentista. L’accento è posto sui metodi di isolamento dei guasti meccanici al fine di individuare con precisione la chiave difettosa, stabilire una diagnosi affidabile ed evitare interventi errati o controproducenti. Sullo strumento dimostrativo vengono ricreati diversi casi complessi ma semplici da risolvere per sviluppare la capacità di individuare la causa, senza limiti di tempo.
- Ore 15:00: Workshop pratico dedicato alla manutenzione preventiva, incentrato sulla pulizia delle scatole d’ottava (portavoce) e dei relativi ugelli. Determinazione degli attrezzi necessari, del protocollo di lavoro e dei punti di attenzione tecnica. Poiché i diametri dei fori degli ugelli della prima e della seconda ottava sono distinti e distinguibili a occhio nudo, è necessario un controllo visivo preliminare per evitare qualsiasi inversione durante il rimontaggio. Dimostrazione delle tecniche operative per prevenire danni materiali al legno o alle chiavi. Analisi delle procedure specifiche in caso di svitamento completo dell’intera scatola d’ottava (portavoce) anziché del solo ugello filettato, metodo di posizionamento dei componenti smontati sul banco da lavoro e applicazione di grasso al silicone per prevenire l’accumulo di condensa. Pulizia effettiva di tutti gli strumenti dei partecipanti. L’acquisto di questa attrezzatura specifica è necessario per garantire l’autonomia dello strumentista durante le manutenzioni stagionali o in caso di intasamento delle chiavi d’ottava causato dall’acqua.
- Ore 16:00: Studio della diagnosi e del trattamento d’emergenza delle crepe (fessurazioni) sul corpo in legno. Una crepa genera sfiati d’aria difficili da individuare, i cui sintomi vengono spesso confusi con un malfunzionamento dell’ancia o del portacanna. L’intervento d’emergenza richiede il ripristino della tenuta del camino o dell’alloggiamento del portavoce interessato, al fine di garantire il corretto posizionamento a tenuta del cuscinetto. L’introduzione di adesivo fluido nella crepa non deve creare uno spessore eccessivo sul bordo superiore del foro di risonanza sotto il cuscinetto, pena la creazione di uno sfiato maggiore rispetto alla crepa iniziale. L’eccesso di adesivo fluido deve essere rasato manualmente per preservare la planarità del legno in quel punto. Gli spessori in eccesso situati al di fuori delle zone di appoggio non compromettono la funzionalità e il trattamento estetico può essere rimandato. Se uno strumento presente presenta una crepa, esso funge da supporto per la dimostrazione della riparazione al fine di ripristinarne temporaneamente la suonabilità, nel periodo di indisponibilità dei laboratori specializzati.
- Ore 17:30: Fine della giornata di formazione.
0 commentaires