Les problèmes d’étanchéité ou autres à main droite ne concernent principalement que les notes produites par elle, mais un bon réglage aura des effets positifs sur les mêmes notes à l’octave ou avec le demi-trou. En revanche, dès le Do# aigu, les doigtés plus complexes révèlent des associations de clés différentes qui nécessitent des réglages spécifiques.
Mis à part le suraigu où les effets d’un dysfonctionnement de la main droite ont des répercutions plus complexes, la localisation d’une fuite, par exemple, est relativement plus aisée à main droite, le nombre de probabilités étant moindre.
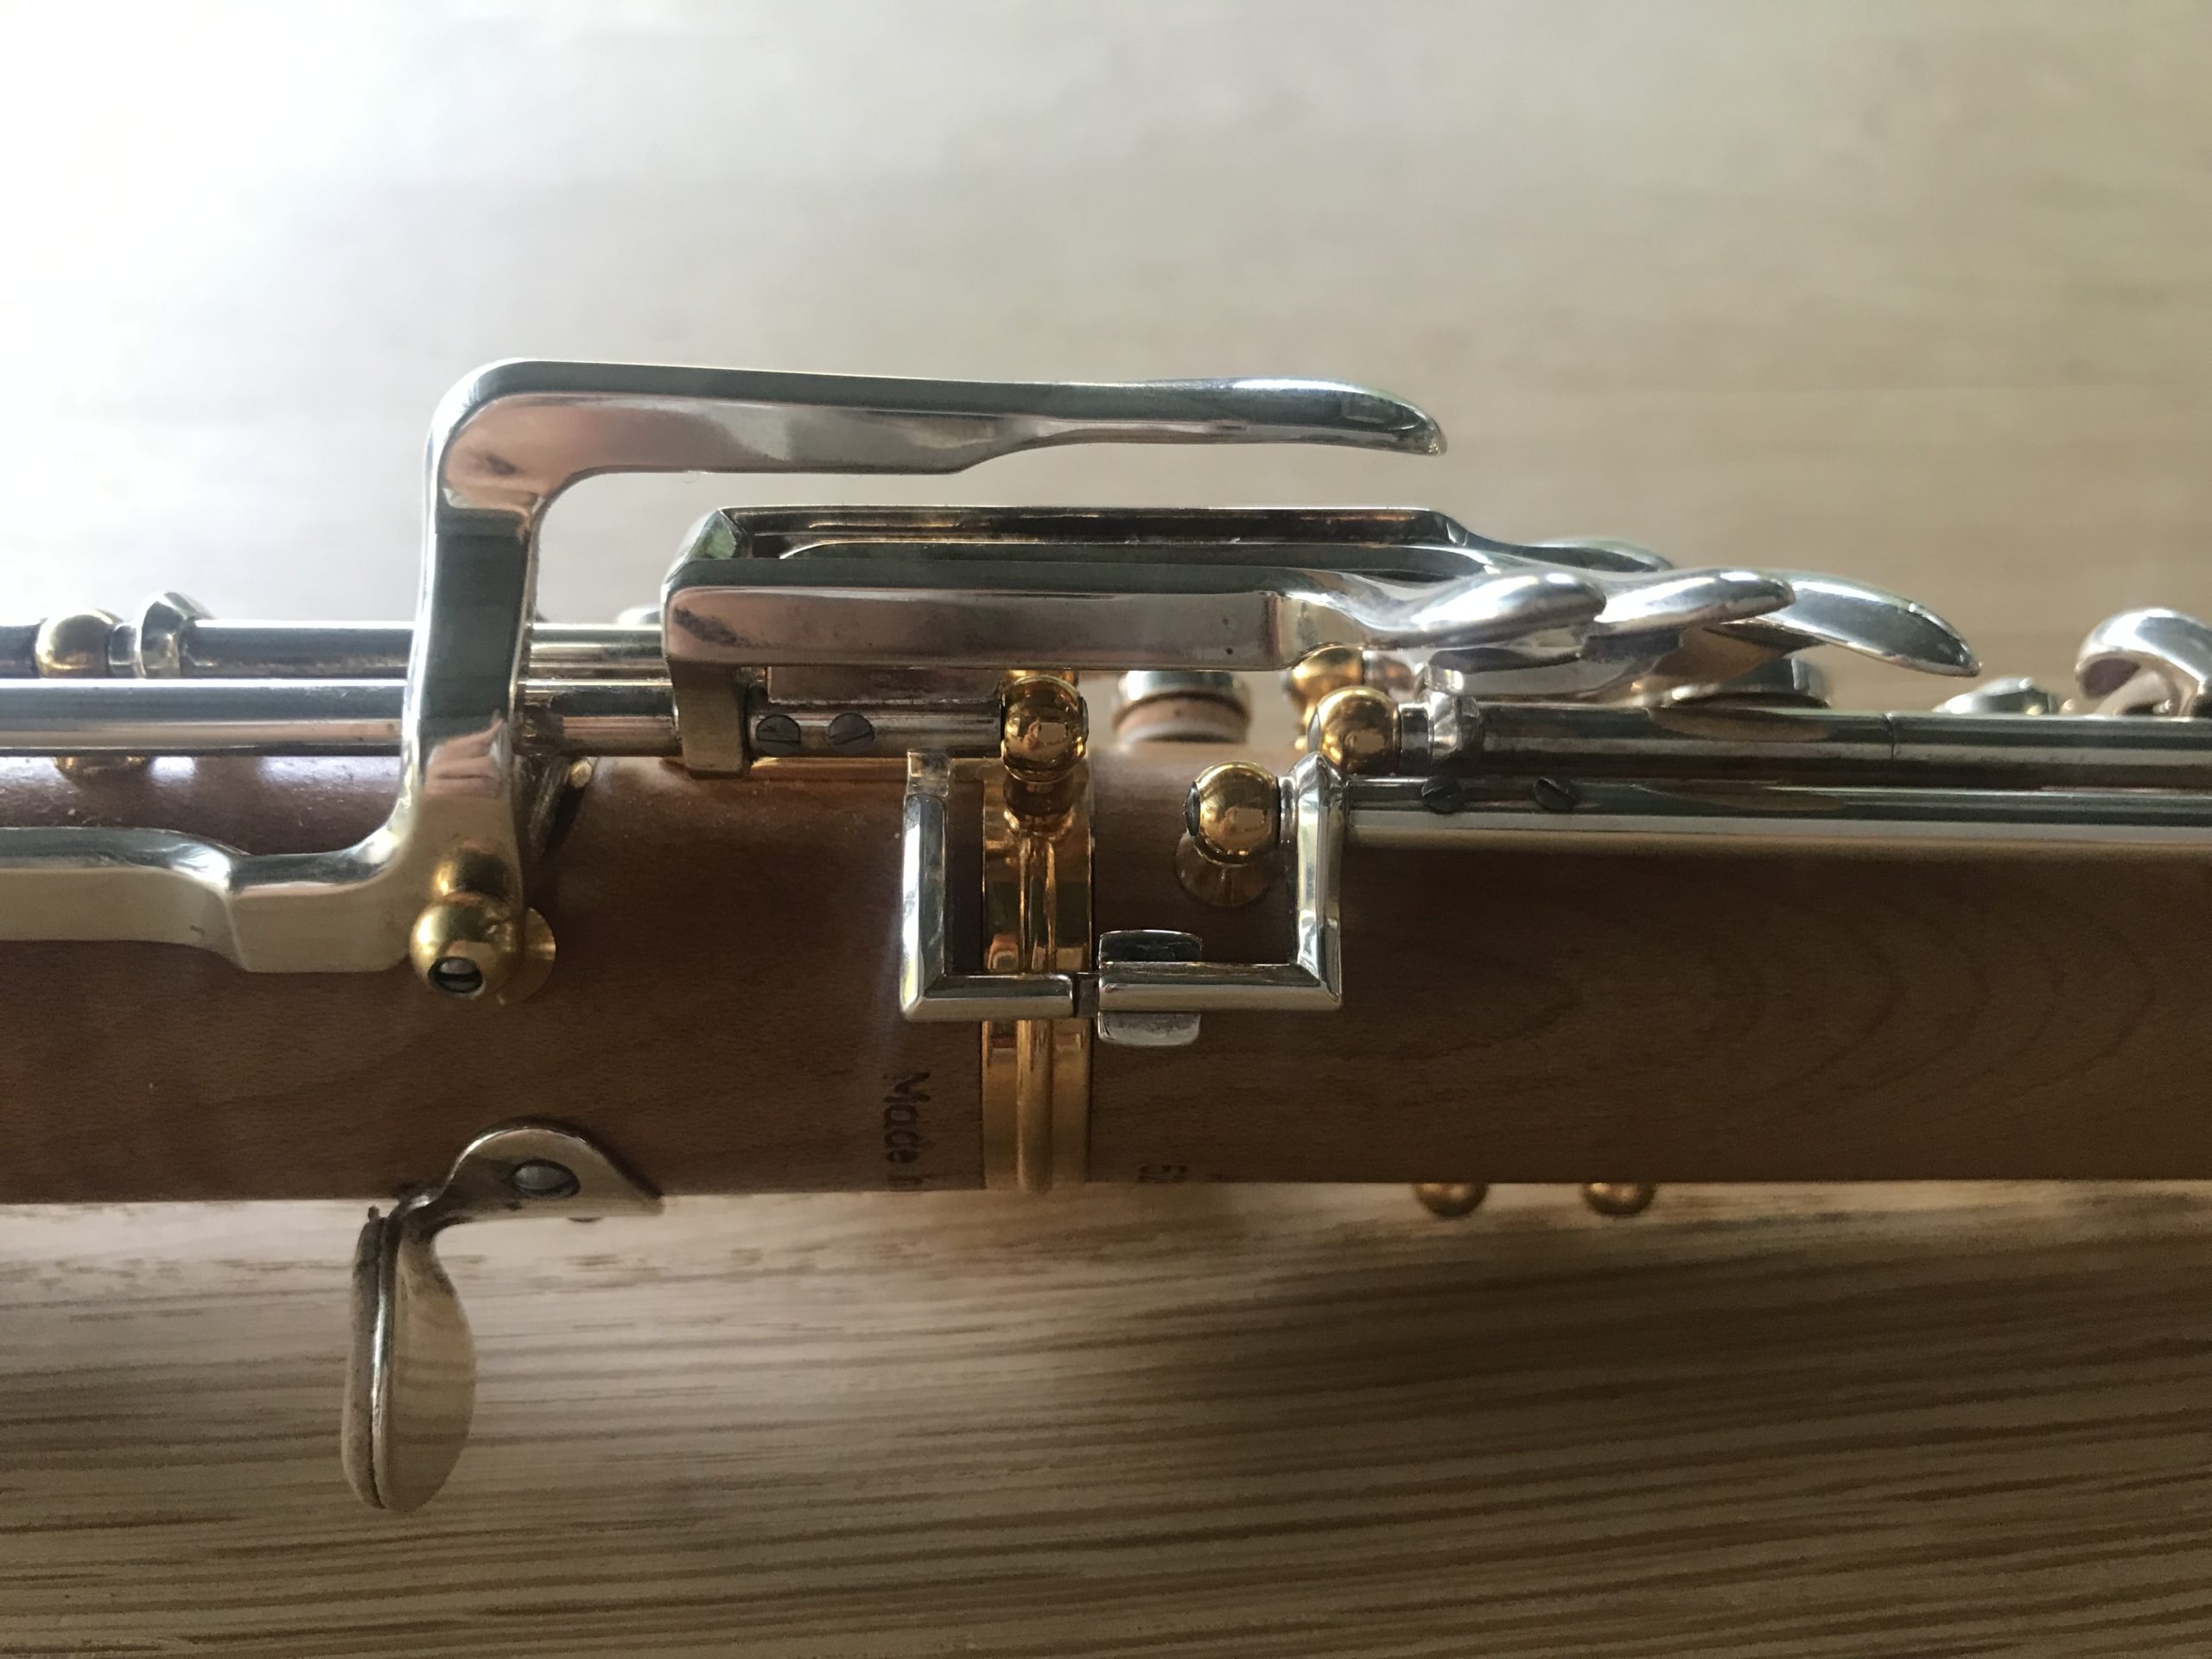
La relation du doigt de Mi avec ses acolytes relève du même principe que ceux du Sol avec les siens (voire les pannes à main gauche). Le respect d’un protocole scrupuleux permet d’équilibrer cette zone avec une grande efficacité. À nouveau, la clé sur laquelle on appuie avec le doigt, en l’occurrence la clé de Mi, est prépondérante, sa voisine directement impliquée venant en deuxième et la petite résonance du Fa de fourche, tout à droite sur la photo ci-dessous, en troisième.
Cette petite clé, à l’instar de la résonance de La pour le Sol suraigu, ne voit sa fermeture dépendre que du Mi après un Fa de fourche. Par conséquent, le rapport entre les deux étant relativement éloigné, il ne faut en aucun cas le faire prédominer, sinon, autant vouloir fermer une porte en laissant un pied à l’intérieur.
Il est donc fréquent que de petits défauts d’équilibre et de réglage entre ces clés provoquent des fuites et que le grave ne réponde pas de façon satisfaisante.
Protocole de réglage à main droite

– 1 2 3
Dévisser la vis de réglage n° 3 préventivement de 30 minutes pour que la résonance du Fa de fourche n’interfère pas dans le réglage du Mi et de sa voisine (flèche jaune 1 et 2 ci-dessous). Pour le Ré, cette action n’a aucune importance puisque cette résonance de Fa de fourche s’ouvre au moment où on appuie sur l’anneau de Ré.
Une fois ce débrayage réalisé, vérifiez l’équilibre entre le Mi et sa voisine et corrigez-le si besoin par la vis n°1 selon la méthode à froid. Celle à chaud nécessitant la présence d’un collègue pour appuyer sur nos doigts ou les clés, elle est moins pratique…
Puis faites de même avec le Ré et la voisine du Mi par l’entremise de la vis n°2.

Adoptez les mêmes gestes que pour la main gauche avec le papier à cigarette. Pour clore ce protocole, une fois ces équilibres contrôlés et parfaits, faites de même entre le Mi et la résonance de Fa de fourche avec la vis n°3. Son étanchéité doit être plus prudente, du fait de son éloignement de l’appui source, mais tout de même suffisante. Revissez-la de 25 minutes puisque vous l’aviez dévissée préventivement de 30 et, petit à petit, réglez-la le plus finement possible.
Do# aigu
Un problème qui trouve sa source à main droite mais n’affectant pas celle-ci est le réglage du Do# aigu. Il arrive que cette note soit instable et que son intonation flotte. Ce phénomène dépend du poids de l’auriculaire droit sur la patte de Do. En effet, cette modification du poids du doigt agit sur la relation entre cette patte (vis n°3) et la clé de Mi et sa voisine (n°1 et 2).

– 1 2 3
Pour le vérifier, il suffit de jouer un Do# aigu et de triller lentement sur la clé de Mi sans boucher le trou central. Si lors de l’appui sur le Mi le son et l’intonation du Do# change pour le mieux, il suffit de serrer un peu la vis n°3 pour le stabiliser et corriger ce défaut.
Mib à gauche
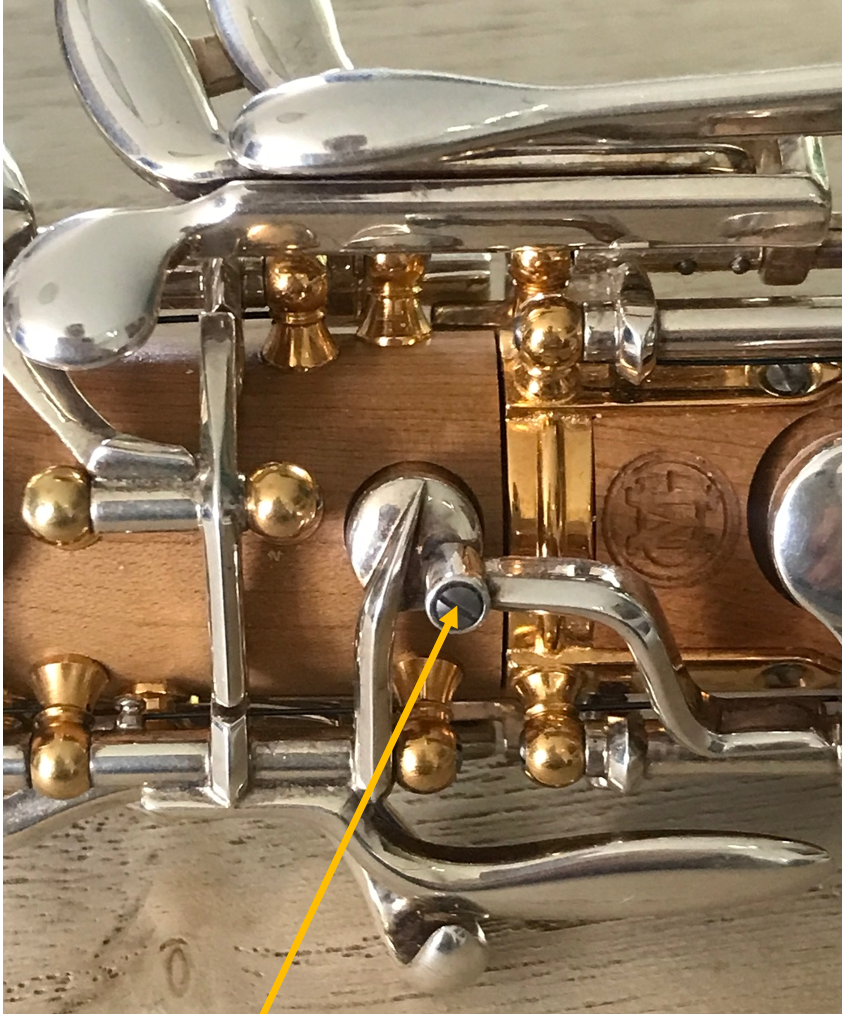
Si la vis pointée par la flèche jaune ci-dessous est trop vissée, elle appuie sur le ressort responsable de la fermeture du Mib qui restera ouvert alors en permanence. Autant dire que le grave en est méchamment perturbé. Dévisser cette vis de réglage jusqu’à laisser un peu de marge entre elle et le ressort en dessous et le tour est joué.

rapport entre les deux corps de l’instrument
Trois points de contact sont à observer entre le corps du haut et du bas de l’instrument
 relation gauche et clés de trille Do#/Ré
 relation droite et résonance de Sol/La
Sur la première photo ci-dessus, on voit les tiges de raccord entre la patte de Fa# et la clé de trille de Ré. Sur la deuxième, on voit les tiges responsables de la levée des résonances de Sol et de La.
Il est impératif qu’un petit jeu se trouve à la jointure de ces tiges, faute de quoi les trilles (dans une moindre mesure car un jeu naturel laisse plus de marge de ce côté) mais surtout les résonances pourraient rester ouvertes en permanence. Autant dire que c’est la catastrophe.
Et pourtant la main gauche n’en est pas responsable!
Si l’on teste l’instrument corps par corps, il sera évident que celui du haut n’est pas à incriminer puisqu’il fonctionne normalement. Dès que l’on rajoute celui du bas, les problèmes commencent. Ils sont donc liés à la relation entre les deux. L’absence de jeu en est la cause. La vis pointée ci-dessous par la flèche orange permet de créer ce jeu. En la vissant, on augmente la distance de l’autre côté et le problème est réglé.
Il arrive qu’au montage de l’instrument, ces tiges se télescopent et se tordent et que les lièges de contact soient arrachés, qu’il en résulte du bruit et des défauts d’efficacité. Tout cela est réparable par nos soins, en règle générale. Il faut redresser les tiges à la main et remplacer les petits lièges pour atténuer le bruit du métal contre le métal. Attention à retrouver l’espace adéquat entre les tiges!
 vis responsable du jeu à la jointure droite
La photo suivante montre le pont entre la patte de Fa# et la clé de Sol#, relation qui permet de jouer ces deux notes simultanément, pour un trille, par exemple. Seulement, pour cela, il faut que le rapport soit parfait, sinon la clé de Sol# se soulève pendant qu’on joue le Fa#. Dans le meilleur des cas, le son devient étrange, fade ou, si la fuite est trop importante, il casse tout simplement.
L’instrument en entier, vérifiez le bouchage du Sol# au papier à cigarette en appuyant avec le pouce de la main droite sur le Fa# et l’index sur le Sol# tout en tirant de la main gauche sur la languette de papier. On peut aussi le tester entre la vis (no1) et la clé de Sol# de la même manière, à froid (cf. l’article à ce sujet). S’il faut trop appuyer sur le Fa#, il faudra donc la dévisser légèrement. Dans le cas contraire, le Sol# se soulève un peu dès que les deux notes sont jouées simultanément, que ce soit intentionnel ou pas, créant une fuite d’air. Un léger tour de vis d’une minute dans le sens horaire devrait suffire. Vérifiez tout de même toujours au papier à cigarette.
Avec des petites mains d’enfant, le risque de déboucher le Fa# existe aussi par contact avec la clé de Sol# à droite que la première phalange de l’index droit vient souvent taquiner. Dans ce cas, de deux maux, il faudra choisir le moindre et chercher petit à petit à arrondir la position de la main droite pour l’éloigner de cette clé
de Sol# droit.
– 1
Some of the most common right-hand « failures
Leakage and other problems in the right hand mainly concern only the notes produced by it, but a good adjustment will have positive effects on the same notes in the octave or with the half-hole. On the other hand, from high C# onwards, more complex fingering reveals different key associations that require specific adjustments.
Apart from the high notes, where the effects of a right-hand dysfunction are more complex, locating a leak, for example, is relatively easier with the right hand, as the number of probabilities is lower.
The relationship between Mi’s finger and its acolytes is based on the same principle as Sol’s relationship with its acolytes (see left-handed malfunctions). By following a scrupulous protocol, you can balance this zone very effectively. Once again, the key pressed with the finger, in this case the E key, is paramount, its directly involved neighbor coming second and the small resonance of the F fork, on the far right in the photo below, third.
This small key, like the resonance of A for G-sharp, is only closed by E after an F fork. Consequently, as the relationship between the two is relatively distant, it must never be allowed to predominate, otherwise it would be like trying to close a door with one foot inside.
It’s not uncommon, therefore, for small errors in balance and adjustment between these keys to cause leaks, and for the bass to fail to respond satisfactorily.
Right-hand adjustment protocol
– 1 2 3
Loosen adjustment screw no. 3 preventively by 30 minutes, so that the resonance of the F fork does not interfere with the adjustment of the E and its neighbor (yellow arrows 1 and 2 below). For D, this action is of no importance, as the F fork resonance opens when the D ring is pressed.
Once the clutch has been disengaged, check the balance between the E and its neighbor, and correct it if necessary using screw n°1 in the cold method. The hot method requires the presence of a colleague to press on our fingers or keys, and is therefore less practical…
Then do the same with the D and the neighboring E using screw n°2.
Adopt the same gestures as for the left hand with the cigarette paper. To conclude this protocol, once these balances have been controlled and perfected, do the same between the E and the F fork resonance with screw n°3. Its tightness should be more cautious, given its distance from the source support, but still sufficient. Screw it back in by 25 minutes, since you had previously unscrewed it by 30, and gradually adjust it as finely as possible.
High C#
A problem that originates in the right hand but does not affect it is the setting of the high C#.. Sometimes this note is unstable and its intonation floats. This phenomenon depends on the weight of the right little finger on the C foot. In fact, this change in finger weight affects the relationship between this tab (screw n°3) and the E key and its neighbor (n°1 and 2).
– 1 2 3
To check this, simply play a high C# and trill slowly on the E key without blocking the central hole. If the sound and intonation of the C# changes for the better when the E is pressed, simply tighten screw n°3 a little to stabilize it and correct this defect.
Eb left
If the screw indicated by the yellow arrow below is tightened too much, it presses on the spring responsible for closing the Eb, which will then remain permanently open. In other words, the bass is seriously affected. Unscrew this adjustment screw until there’s a little margin between it and the spring below, and that’s it.
Relationship between the two bodies of the instrument
There are three points of contact between the upper and lower body of the instrument
left relationship of the D trill
right relationship of G/A resonances
The first photo above shows the connecting rods between the F# lug and the D trill key. The second shows the rods responsible for lifting the G and A resonances.
It’s imperative that there’s a small amount of play at the joint between these rods, otherwise the trills (to a lesser extent, as a natural play leaves more margin on this side) but above all the resonances could remain permanently open. In other words, a catastrophe.
And yet the left hand is not responsible!
If we test the instrument body by body, it will be obvious that the top one is not to blame, since it functions normally. As soon as you add the bottom one, the problems start. They are linked to the relationship between the two. The lack of clearance is the cause. The screw shown below with the orange arrow creates this clearance. By screwing it in, you increase the distance on the other side and the problem is solved.
Sometimes, when assembling the instrument, these rods telescope and bend, and the contact corks are torn off, resulting in noise and inefficiency. As a rule, we can repair these problems ourselves. You need to straighten the rods by hand and replace the small corks to attenuate the noise of metal against metal. Be careful to find the right space between the rods!
screw responsible for a small amount of play at right joint
The following photo shows the bridge between the F# and the G# key, a relationship that enables these two notes to be played simultaneously, for a trill, for example. However, to do this, the relationship must be perfect, otherwise the G# key will lift while the F# is being played. In the best case, the sound becomes strange, bland or, if the leakage is too great, it simply breaks.
With the instrument in its entirety, check that the G# is plugged with cigarette paper by pressing the thumb of the right hand on the F# and the index finger on the G#, while pulling the paper tab with the left hand. You can also test it between the screw (no.1) and the G# key in the same way, cold (see the article on this subject). If you need to press too hard on the F#, unscrew it slightly. Otherwise, the G# rises a little as soon as the two notes are played simultaneously, whether intentionally or not, creating an air leak. A slight clockwise turn of the screw for one minute should suffice. Always check with cigarette paper.
With small children’s hands, there’s also the risk of unclogging the F# by contact with the G# key on the right, which the first phalanx of the right index finger often teases. In this case, you’ll have to choose the lesser of two evils, and gradually try to round out the position of the right hand, away from this right G# key.
– 1
Einige der häufigsten « Pannen » in der rechten Hand
Probleme mit der Dichtheit oder Ähnlichem in der rechten Hand betreffen hauptsächlich nur die von ihr erzeugten Noten, aber eine gute Einstellung wird sich auch bei denselben Noten in der Oktave oder mit dem halben Loch positiv auswirken. Ab dem hohen Cis hingegen zeigen sich bei komplexeren Fingersätzen unterschiedliche Schlüsselassoziationen, die spezifische Einstellungen erfordern.
Abgesehen von den hohen Tönen, bei denen die Auswirkungen einer Fehlfunktion der rechten Hand komplexere Auswirkungen haben, ist beispielsweise das Auffinden eines Lecks in der rechten Hand relativ einfacher, da die Anzahl der Wahrscheinlichkeiten geringer ist.
Die Beziehung des Fingers von Mi zu seinen Nebenfingern folgt demselben Prinzip wie die Beziehung des Fingers von G zu seinen Nebenfingern (siehe linkshändige Pannen). Wenn man sich an ein genaues Protokoll hält, kann man diesen Bereich mit großer Effizienz ausgleichen. Auch hier ist der Schlüssel, auf den man mit dem Finger drückt, in diesem Fall der E-Schlüssel, ausschlaggebend, sein direkt beteiligter Nachbar kommt an zweiter Stelle und die kleine Resonanz des Gabelfasses, ganz rechts auf dem Bild unten, an dritter Stelle.
Diese kleine Tonart ist, ähnlich wie die A-Resonanz beim hohen G, nach einem Gabelfagott nur von der E-Resonanz abhängig. Da das Verhältnis zwischen den beiden relativ weit auseinander liegt, darf es also auf keinen Fall überwiegen, denn sonst wäre es so, als wollte man eine Tür schließen, indem man einen Fuß drin lässt.
Es kommt daher häufig vor, dass kleine Fehler im Gleichgewicht und in der Einstellung zwischen diesen Schlüsseln zu Undichtigkeiten führen und der Bass nicht zufriedenstellend anspricht.
Abstimmungsprotokoll für die rechte Hand
– 1 2 3
Drehen Sie die Einstellschraube Nr. 3 präventiv um 30 Minuten heraus, damit die Resonanz des Gabelfis nicht die Einstellung des E und seiner Nachbarin stört (gelber Pfeil 1 und 2 unten). Für das D spielt diese Maßnahme keine Rolle, da sich diese Gabel-F-Resonanz in dem Moment öffnet, in dem man den D-Ring drückt.
Nachdem Sie die Kupplung gelöst haben, überprüfen Sie die Balance zwischen dem E und seiner Nachbarin und korrigieren Sie sie gegebenenfalls mit der Schraube Nr. 1 nach der kalten Methode. Die warme Methode erfordert die Anwesenheit eines Kollegen, der unsere Finger oder die Schlüssel drückt, und ist daher weniger praktisch…
Anschließend verfahren Sie mit der Schraube Nr. 2 beim D und der Nachbarin des E genauso.
Achten Sie auf die gleichen Bewegungen wie bei der linken Hand mit dem Zigarettenpapier. Zum Abschluss dieses Protokolls, nachdem Sie diese Gleichgewichte kontrolliert und perfektioniert haben, machen Sie das Gleiche zwischen dem E und der F-Gabelresonanz mit Schraube Nr. 3. Sie muss vorsichtiger abgedichtet werden, da sie weiter von der Quellenstütze entfernt ist, aber dennoch ausreichen. Drehen Sie sie um 25 Minuten zurück, da Sie sie zuvor um 30 Minuten herausgedreht hatten, und stellen Sie sie nach und nach so fein wie möglich ein.
Hohes Cis
Ein Problem, das seinen Ursprung in der rechten Hand hat, diese aber nicht beeinträchtigt, ist die Einstellung des hohen Cis. Es kommt vor, dass diese Note instabil ist und die Intonation flattert. Dieses Phänomen hängt vom Gewicht des kleinen Fingers der rechten Hand auf dem C-Fuß ab. Denn diese Gewichtsveränderung des Fingers wirkt sich auf die Beziehung zwischen dieser Lasche (Schraube Nr. 3) und der E-Schlüssel und ihrer Nachbarin (Nr. 1 und 2) aus.
– 1 2 3
Um dies zu überprüfen, spielen Sie einfach ein hohes C# und trillern Sie langsam auf der E-Klappe, ohne das Mittelloch zu verstopfen. Wenn sich beim Drücken des E der Klang und die Intonation des C# zum Besseren verändert, genügt es, die Schraube Nr. 3 ein wenig anzuziehen, um es zu stabilisieren und diesen Fehler zu beheben.
Eb links
Wenn die Schraube, auf die der gelbe Pfeil unten zeigt, zu fest angezogen ist, drückt sie auf die Feder, die für das Schließen des Eb verantwortlich ist, das dann dauerhaft offen bleibt. Das bedeutet, dass der Bassbereich stark gestört wird. Drehen Sie die Einstellschraube so weit heraus, dass zwischen ihr und der darunter liegenden Feder ein wenig Spielraum bleibt, und die Sache ist erledigt.
Verhältnis zwischen den beiden Instrumentenkörpern
Zwischen dem oberen und dem unteren Korpus des Instruments sind drei Berührungspunkte zu beachten.
linke Beziehung des D-Trillerschlüssels
rechte Beziehung der G/A-Resonanzen.
Auf dem ersten Bild oben sieht man die Verbindungsstangen zwischen dem F#-Bein und der D-Trillerklappe. Auf dem zweiten Bild sieht man die Stäbe, die für die Aufhebung der Resonanzen von G und A verantwortlich sind.
Es ist unbedingt notwendig, dass sich an der Verbindung dieser Stäbe ein kleiner Spielraum befindet, da sonst die Triller (in geringerem Maße, da ein natürlicher Spielraum hier mehr Spielraum lässt), aber vor allem die Resonanzen dauerhaft offen bleiben können. Das wäre eine Katastrophe.
Und das, obwohl die linke Hand nicht dafür verantwortlich ist!
Wenn man das Instrument Korpus für Korpus testet, ist es offensichtlich, dass der obere Korpus nicht schuld ist, da er normal funktioniert. Sobald man den unteren Körper hinzufügt, beginnen die Probleme. Sie hängen also mit der Beziehung zwischen den beiden zusammen. Die Ursache dafür ist das fehlende Spiel. Die Schraube, die unten mit dem orangefarbenen Pfeil markiert ist, ermöglicht es, dieses Spiel zu erzeugen. Wenn man sie eindreht, vergrößert man den Abstand auf der anderen Seite und das Problem ist gelöst.
Es kommt vor, dass sich diese Stangen beim Zusammenbau des Instruments teleskopieren und verdrehen und die Kontaktkorken abgerissen werden, was zu Geräuschen und Wirkungsmängeln führt. All dies kann in der Regel von uns repariert werden. Die Stifte müssen von Hand gerichtet und die kleinen Korken ersetzt werden, um das Geräusch von Metall auf Metall zu dämpfen. Achten Sie darauf, den richtigen Abstand zwischen den Stäben zu finden!
Schraube, die für das Spiel am rechten Gelenk verantwortlich ist
Das nächste Bild zeigt die Brücke zwischen dem F#-Bein und der G#-Klappe, die es ermöglicht, diese beiden Noten gleichzeitig zu spielen, z. B. für einen Triller. Nur muss dazu die Beziehung perfekt sein, sonst hebt sich der Gis-Schlüssel, während man das Fis spielt. Im besten Fall klingt der Ton dann merkwürdig, fad oder, wenn das Leck zu groß ist, bricht er einfach ab.
Prüfen Sie mit dem ganzen Instrument die Verstopfung des G# mit Zigarettenpapier, indem Sie mit dem Daumen der rechten Hand auf das F# und mit dem Zeigefinger auf das G# drücken und gleichzeitig mit der linken Hand an der Papierlasche ziehen. Man kann es auch zwischen der Schraube (Nr. 1) und dem Gis-Schlüssel auf die gleiche Weise in kaltem Zustand testen (siehe den Artikel zu diesem Thema). Wenn zu viel Druck auf das F# ausgeübt werden muss, muss sie also etwas herausgedreht werden. Andernfalls hebt sich das Gis ein wenig, sobald beide Noten gleichzeitig gespielt werden, ob absichtlich oder unabsichtlich, wodurch ein Luftleck entsteht. Eine leichte Drehung der Schraube von einer Minute im Uhrzeigersinn sollte ausreichen. Überprüfen Sie es trotzdem immer mit Zigarettenpapier.
Bei kleinen Kinderhänden besteht auch die Gefahr, dass das F# durch Kontakt mit dem G#-Schlüssel auf der rechten Seite, den das erste Glied des rechten Zeigefingers oft neckt, verstopft wird. In diesem Fall sollte man das kleinere Übel wählen und versuchen, die Position der rechten Hand nach und nach abzurunden, um sie von diesem Schlüssel wegzubewegen. von Gis rechts zu entfernen.
– 1
Alcuni dei più comuni « guasti » della mano destra
I problemi di impermeabilità e simili nella mano destra riguardano principalmente le note prodotte da essa, ma una buona regolazione avrà effetti positivi sulle stesse note all’ottava o con il mezzo foro. D’altra parte, dal Do# acuto in poi, diteggiature più complesse rivelano diverse combinazioni di tasti che richiedono regolazioni specifiche.
A parte le note alte, dove gli effetti di un malfunzionamento della mano destra hanno ripercussioni più complesse, localizzare una perdita, ad esempio, è relativamente più facile con la mano destra, perché ci sono meno probabilità.
Il rapporto tra il dito di Mi e i suoi accoliti si basa sullo stesso principio del rapporto tra Sol e i suoi accoliti (vedi malfunzionamenti della mano sinistra). Seguendo un protocollo scrupoloso, è possibile bilanciare questa zona in modo molto efficace. Ancora una volta, il tasto su cui si preme il dito, in questo caso il Mi, è predominante, il suo vicino direttamente coinvolto è secondo e la piccola risonanza della forchetta del Fa, all’estrema destra nella foto qui sotto, è terza.
Questo piccolo tasto, come la risonanza del La per il Sol diesis, viene chiuso solo dalla forchetta del Mi dopo quella del Fa. Di conseguenza, poiché il rapporto tra i due è relativamente distante, non bisogna mai permettergli di dominare, altrimenti sarebbe come cercare di chiudere una porta con un piede dentro.
Non è quindi raro che piccoli errori di bilanciamento e di regolazione tra queste chiavi causino perdite e che il basso non risponda in modo soddisfacente.
Protocollo di regolazione per la mano destra
– 1 2 3
Svitare preventivamente la vite di regolazione n. 3 per 30 minuti, in modo che la risonanza della forcella del Fa non interferisca con la regolazione del Mi e della sua vicina (frecce gialle 1 e 2 in basso). Per la D, questa azione non ha alcuna importanza, in quanto la risonanza della forcella F si apre quando si preme l’anello D.
Una volta disinnestata la frizione, verificare il bilanciamento tra la E e la sua vicina e, se necessario, correggerlo con la vite 1, utilizzando il metodo a freddo. Il metodo a caldo richiede la presenza di un collega che prema sulle nostre dita o sui tasti, ed è meno pratico…
Poi fate lo stesso con il Re e il Mi vicino usando la vite n. 2.
Utilizzate gli stessi gesti della mano sinistra con la carta delle sigarette. Per concludere questo protocollo, dopo aver controllato l’equilibrio e averlo ottenuto, fate lo stesso con il Mi e la risonanza della forchetta del Fa usando la vite n. 3. La sua stretta deve essere più cauta. Il suo serraggio deve essere più cauto, a causa della sua distanza dal supporto della sorgente, ma comunque sufficiente. Riavvitatela per 25 minuti, dato che prima l’avevate svitata per 30, e regolatela gradualmente nel modo più fine possibile.
Do# acuto
Un problema che si presenta alla mano destra ma che non la riguarda è la regolazione del Do# acuto. A volte questa nota è instabile e la sua intonazione fluttua. Questo fenomeno dipende dal peso del mignolo destro sul piede del Do. Infatti, questa variazione del peso del dito influisce sul rapporto tra questa linguetta (vite n. 3) e il tasto Mi e i suoi vicini (nn. 1 e 2).
– 1 2 3
Per verificarlo, basta suonare un Do# acuto e trillare lentamente sulla chiave di Mi senza bloccare il foro centrale. Se il suono e l’intonazione del Do diesis cambiano in meglio quando si preme il Mi, è sufficiente stringere leggermente la vite n. 3 per stabilizzarla e correggere questo difetto.
Mib sinistro
Se la vite indicata dalla freccia gialla in basso viene stretta troppo, premerà sulla molla responsabile della chiusura del Mi, che rimarrà così permanentemente aperto. In altre parole, i bassi ne risentiranno. Svitare questa vite di regolazione fino a lasciare un piccolo margine tra essa e la molla sottostante e il gioco è fatto.
Rapporto tra i due corpi dello strumento
I punti di contatto tra il corpo superiore e quello inferiore dello strumento sono tre.
relazione a sinistra del tasto trillo D
relazione a destra delle risonanze G/A.
La prima foto mostra le aste di collegamento tra il piedino del Fa# e la chiave del trillo di Re. La seconda mostra le aste che sollevano le risonanze di Sol e La.
È indispensabile che ci sia una piccola quantità di gioco alla giunzione di queste aste, altrimenti i trilli (in misura minore, poiché un gioco naturale lascia più margine da questo lato) ma soprattutto le risonanze potrebbero rimanere permanentemente aperte. In altre parole, è un disastro.
Eppure la mano sinistra non è responsabile!
Se si testa lo strumento corpo per corpo, sarà evidente che quello superiore non ha alcuna colpa, poiché funziona normalmente. Non appena si aggiunge quello inferiore, iniziano i problemi. I problemi sono quindi legati al rapporto tra i due corpi. La mancanza di gioco è la causa. La vite indicata sotto con la freccia arancione crea questo spazio. Avvitandola, si aumenta la distanza dall’altro lato e il problema è risolto.
Occasionalmente, durante l’assemblaggio dello strumento, queste aste si piegano e si ritraggono e i tappi di contatto si strappano, causando rumore e inefficienza. In generale, tutto questo può essere riparato da noi. Le aste devono essere raddrizzate a mano e i piccoli tappi sostituiti per ridurre il rumore del metallo contro il metallo. Fate attenzione a trovare il giusto spazio tra le aste!
Vite responsabile del gioco nel giunto destro
La foto seguente mostra il ponte tra le chiavi di Fa# e di Sol#, una relazione che permette di suonare queste due note contemporaneamente, ad esempio per un trillo. Tuttavia, perché ciò avvenga, la relazione deve essere perfetta, altrimenti la chiave di Sol# si solleverà mentre si suona il Fa#. Nel migliore dei casi, il suono diventa strano, insipido o, se la perdita è eccessiva, semplicemente si rompe.
Con lo strumento al completo, verificare che il Sol# sia tappato con la carta di sigaretta premendo il pollice della mano destra sul Fa# e l’indice sul Sol# e tirando la linguetta di carta con la mano sinistra. Si può anche fare la prova tra la vite (n. 1) e il tasto G# nello stesso modo, a freddo (si veda l’articolo su questo argomento). Se dovete premere troppo sul Fa#, svitatelo leggermente. In caso contrario, il Sol# si alzerà un po’ non appena le due note vengono suonate contemporaneamente, intenzionalmente o meno, creando una perdita d’aria. Un leggero giro della vite in senso orario per un minuto dovrebbe essere sufficiente. Controllare sempre con la carta delle sigarette.
Con le mani dei bambini piccoli, c’è anche il rischio di sturare il Fa# a causa del contatto con il tasto Sol# a destra, che spesso viene stuzzicato dalla prima falange dell’indice destro. In questo caso, bisogna scegliere il male minore e cercare di arrotondare gradualmente la posizione della mano destra allontanandola dal tasto G# destro.
– 1
0 commentaires