
En prévision de cet incident à domicile, il est recommandé de se munir de l’outil suivant :
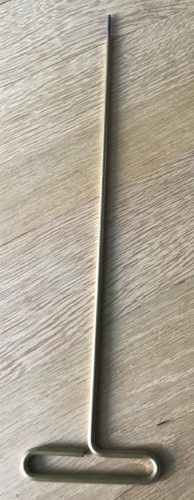
Extraire un écouvillon coincé dans la perce (urgence avant concert)
Lorsqu’un écouvillon se bloque à l’intérieur de la perce étroite du corps du haut, l’utilisation d’un tire-écouvillon de luthier (longue tige métallique terminée par un pas de vis conique en tire-bouchon) constitue la solution idéale. Grâce à son profil fileté et à la longueur de sa tige, l’introduction de cet outil par rotation à l’intérieur de la perce permet d’enrouler et de harponner les fibres du tissu. L’extraction de l’écouvillon s’effectue ainsi sans endommager la surface interne du bois.
À la suite de ces incidents répétés, les fabricants ont généralisé l’usage d’écouvillons dotés d’un cordon de sécurité à chaque extrémité (double ficelle avec cordon de rappel), ce qui réduit considérablement la fréquence de ces blocages. Toutefois, l’utilisation d’anciens modèles dépourvus de cette sécurité présente toujours un risque de coincement élevé. Cette situation mécanique est particulièrement fréquente chez les jeunes élèves, nécessitant une intervention rapide de la part de l’enseignant pour restaurer la fonctionnalité de l’instrument.
La règle d’or : ne jamais tirer vers le haut
Il est impératif de renoncer à toute tentative d’extraction forcée du tissu vers la partie supérieure (la section la plus étroite de la perce conique). Cette manipulation engendre systématiquement un blocage définitif : l’énorme pression exercée par la compression du nœud textile contre les parois internes peut provoquer l’éclatement immédiat du bois.
Procédure de secours sans outil spécialisé
En l’absence de tire-écouvillon en situation d’urgence avant une performance, une procédure alternative permet de résoudre le blocage en utilisant l’axe principal de la main gauche (la longue tringle supportant les plateaux de Si, La et Sol) comme poussoir de fortune pour refouler le nœud textile vers le bas (la section de diamètre plus large de la perce). La durée de l’opération est proportionnelle à la force de traction initialement exercée sur le chiffon.
Étapes d’exécution :
- Démontage des clés de la main gauche : Dévisser et retirer l’axe principal de la main gauche. Récupérer délicatement les clés libérées (Si, La, Sol) et les poser dans l’ordre sur une serviette propre. (Si l’écouvillon est coincé tout en haut, dévisser également les deux boîtes d’octave pour éviter que leurs cheminées n’accrochent le tissu).
- Refoulement progressif par le haut : Introduire l’axe métallique par le haut de la perce (piperelle), côté pointe lisse contre le tissu afin de préserver le filetage et la fente de la tête de vis. En protégeant la tête de l’axe avec un chiffon plié ou une petite cale en bois, exercer de très légères percussions répétées à l’aide d’un manche de couteau ou d’un petit maillet. Attention : frapper bien dans l’axe et avec retenue pour ne jamais flamber (tordre) l’axe en acier. Sous l’effet des vibrations, le nœud textile recule lentement et se détend à l’intérieur du tube.
- Extraction par les trous de tonalité : Dès que le tissu est suffisamment refoulé vers le bas, utiliser un petit crochet métallique (ou un trombone déplié) pour tirer progressivement les plis du chiffon à travers les cheminées successives des trous de tonalité, en veillant à ne jamais prendre appui sur les couronnes en bois pour ne pas les blesser. Poursuivre jusqu’à ce qu’une prise suffisante permette de saisir le chiffon par l’extrémité inférieure du corps du haut.
Ce protocole requiert une exécution méthodique, de la patience et une grande régularité dans les impacts. Une fois le tissu extrait, inspecter et nettoyer l’intérieur de la perce avant de remonter soigneusement les clés de la main gauche.
English
Emergency removal of a swab stuck in the drill hole.
To prepare for this type of incident at home, it is recommended that you have a specialized swab extractor tool on hand:
Extracting a Stuck Swab from the Bore (Pre-Concert Emergency)
When a swab gets stuck inside the narrow bore of the upper joint, using a repair technician’s swab puller (a long metal rod ending in a tapered corkscrew thread) is the ideal solution. Thanks to its threaded profile and shaft length, twisting this tool down into the bore catches and hooks onto the fabric fibers, allowing the swab to be pulled out without damaging the inner wooden surface.
Following repeated incidents of this kind, manufacturers standardized swabs fitted with a safety cord at both ends (double pull-through cord), which significantly reduces the frequency of such jams. However, using older models lacking this safety feature still poses a high risk of getting stuck. This mechanical predicament is especially common among young students, requiring quick intervention by the teacher to restore the instrument to playing condition.
The Golden Rule: Never Pull Upward
You must strictly refrain from any attempt to forcefully pull the fabric out toward the top (the narrowest section of the conical bore). Doing so systematically causes an irreversible jam: the immense outward pressure created by compressing the fabric knot against the inner walls can immediately crack the wood.
Emergency Procedure Without Specialized Tools
If no swab puller is available in an emergency right before a performance, an alternative procedure resolves the jam by using the main left-hand hinge rod (the long axle supporting the B, A, and G key cups) as a makeshift push rod to drive the fabric knot downward toward the wider end of the bore. The time required for this operation is proportional to how hard the swab was initially pulled.
Execution Steps:
- Removing the left-hand keys: Unscrew and slide out the main left-hand axle. Carefully collect the released keys (B, A, G) and lay them out in order on a clean towel. (If the swab is jammed near the very top, also unscrew the two octave boxes so their protruding chimneys do not snag or tear the fabric).
- Gradual downward pushing from the top: Insert the metal axle from the top of the bore (reed well), smooth tip first against the fabric to protect the threads and screwdriver slot on the screw head. While cushioning the head of the axle with a folded cloth or a small wooden block, apply very light, repeated taps using a knife handle or small mallet. Caution: tap straight along the axis and with restraint so you never buckle (bend) the steel axle. Under the effect of the vibrations, the fabric knot slowly backs down and loosens inside the tube.
- Pulling out through the tone holes: As soon as the fabric is pushed far enough downward, use a small metal hook (or an unfolded paperclip) to gradually pull folds of the cloth down through successive tone holes, taking care never to lever against the wooden rims so as not to nick them. Continue until enough fabric is within reach to grasp and pull it out from the bottom end of the upper joint.
This protocol requires methodical execution, patience, and steady, even taps. Once the cloth is removed, inspect and clean the inside of the bore before carefully reassembling the left-hand keys.
Deutsch
Notfall-Entfernung eines in der Innenbohrung feststeckenden Wischers
Zur Vorbeugung gegen diesen Zwischenfall zu Hause wird empfohlen, sich das folgende Spezialwerkzeug zuzulegen:
Einen feststeckenden Wischer aus der Bohrung entfernen (Notfall vor dem Konzert)
Wenn ein Durchziehwischer in der engen Bohrung des Oberstücks stecken bleibt, ist der Einsatz eines speziellen Wischerziehers aus der Werkstatt (einer langen Metallstange mit konischem Korkenzieher-Gewinde an der Spitze) die ideale Lösung. Durch sein Gewindeprofil und die Länge des Schafts lässt sich dieses Werkzeug in die Bohrung eindrehen, greift die Stofffasern und ermöglicht das Herausziehen des Wischers, ohne die innere Holzoberfläche zu beschädigen.
Aufgrund wiederholter Vorfälle dieser Art haben die Hersteller Wischer mit einer Sicherheitsschnur an beiden Enden (Doppelschnur bzw. Rückholschnur) zum Standard gemacht, was die Häufigkeit solcher Blockaden erheblich reduziert. Die Verwendung älterer Modelle ohne diese Sicherung birgt jedoch nach wie vor ein hohes Risiko des Festklemmens. Besonders häufig passiert dies jungen Schülern, was ein rasches Eingreifen der Lehrkraft erfordert, um das Instrument wieder spielbereit zu machen.
Die goldene Regel: Niemals nach oben ziehen
Verzichten Sie unter allen Umständen auf jeden Versuch, den Stoff gewaltsam nach oben (in den engsten Bereich der konischen Bohrung) herauszuziehen. Dies führt unweigerlich zu einer endgültigen Blockade: Der enorme Druck, der durch das Zusammenpressen des Stoffknotens gegen die Innenwände entsteht, kann das Holz sofort zum Reißen bringen.
Notfall-Verfahren ohne Spezialwerkzeug
Steht im Notfall kurz vor einem Auftritt kein Wischerzieher zur Verfügung, lässt sich die Blockade mit einer Notlösung beheben: Dabei dient die Hauptachse der linken Hand (die lange Achse, auf der die H-, A- und G-Deckel sitzen) als Behelfsstößel, um den Stoffknoten nach unten in den weiteren Bereich der Bohrung zurückzuschieben. Die Dauer des Vorgangs hängt davon ab, wie kräftig zuvor am Wischer gezogen wurde.
Arbeitsschritte:
- Ausbau der Klappen der linken Hand: Schrauben Sie die Hauptachse der linken Hand heraus und ziehen Sie sie ab. Nehmen Sie die gelösten Klappen (H, A, G) vorsichtig ab und legen Sie sie der Reihe nach auf ein sauberes Handtuch. (Steckt der Wischer ganz oben fest, schrauben Sie zusätzlich die beiden Oktavkessel heraus, damit deren hineinragende Kamine den Stoff nicht aufreißen oder festhalten).
- Schrittweises Zurückschieben von oben: Führen Sie die Metallachse von oben durch die Rohraufnahme (Hülse) in die Bohrung ein – und zwar mit der glatten Spitze voran zum Stoff, um das Gewinde und den Schraubenschlitz am Kopf der Achse zu schonen. Schützen Sie den Schraubenkopf mit einem gefalteten Tuch oder einem kleinen Holzklötzchen und führen Sie sehr leichte, wiederholte Schläge mit einem Messergriff oder einem kleinen Holzhammer aus. Achtung: Schlagen Sie exakt in Achsrichtung und mit Gefühl, damit sich die dünne Stahlachse keinesfalls verbiegt. Durch die Erschütterungen wandert der Stoffknoten langsam nach unten und lockert sich im Inneren des Rohrs.
- Herausziehen über die Tonlöcher: Sobald der Stoff weit genug nach unten geschoben wurde, ziehen Sie die Stofffalten mithilfe eines kleinen Metallhakens (oder einer aufgebogenen Büroklammer) schrittweise durch die aufeinanderfolgenden Tonlöcher weiter nach unten. Achten Sie dabei streng darauf, den Haken niemals auf den hölzernen Tonlochkronen abzustützen, um diese nicht zu beschädigen. Fahren Sie fort, bis genug Stoff greifbar ist, um ihn am unteren Ende des Oberstücks herauszuziehen.
Dieses Vorgehen erfordert methodisches Arbeiten, Geduld und gleichmäßige, sanfte Schläge. Sobald der Stoff entfernt ist, kontrollieren und reinigen Sie das Innere der Bohrung, bevor Sie die Klappen der linken Hand wieder sorgfältig montieren.
Italiano
Rimozione d’emergenza di uno scovolino incastrato nella cameratura
In previsione di questo incidente domestico, si raccomanda di procurarsi il seguente strumento:
Estrarre uno scovolino incastrato nella cameratura (emergenza prima del concerto)
Quando uno scovolino si blocca all’interno della stretta cameratura del corpo superiore, l’impiego di un estrattore per scovolini da laboratorio (una lunga asta metallica terminante con una punta filettata conica a cavatappi) rappresenta la soluzione ideale. Grazie al profilo filettato e alla lunghezza dello stelo, l’introduzione rotatoria di questo attrezzo nella cameratura permette di arrotolare e agganciare le fibre del tessuto, consentendo di estrarre lo scovolino senza danneggiare la superficie interna del legno.
In seguito al ripetersi di questi incidenti, i produttori hanno generalizzato l’uso di scovolini dotati di un cordino di sicurezza a entrambe le estremità (doppio cordino di richiamo), riducendo notevolmente la frequenza di tali blocchi. Tuttavia, l’utilizzo di vecchi modelli privi di questa sicurezza comporta ancora un elevato rischio di incastro. Questa situazione meccanica è particolarmente frequente tra i giovani allievi e richiede un intervento rapido da parte dell’insegnante per ripristinare la funzionalità dello strumento.
La regola d’oro: mai tirare verso l’alto
È tassativo rinunciare a qualsiasi tentativo di estrazione forzata del tessuto verso la parte superiore (la sezione più stretta della cameratura conica). Questa manovra provoca sistematicamente un bloccaggio definitivo: l’enorme pressione esercitata dalla compressione del nodo di tessuto contro le pareti interne può causare l’immediata spaccatura del legno.
Procedura di emergenza senza attrezzi specializzati
In assenza di un estrattore in una situazione d’emergenza prima di un’esibizione, una procedura alternativa consente di risolvere il blocco utilizzando l’asse principale della mano sinistra (la lunga asta che sostiene i piattelli del Si, La e Sol) come spintore di fortuna per respingere il nodo di tessuto verso il basso (la sezione di diametro maggiore della cameratura). La durata dell’operazione è proporzionale alla forza di trazione esercitata inizialmente sullo scovolino.
Fasi di esecuzione:
- Smontaggio delle chiavi della mano sinistra: Svitare ed estrarre l’asse principale della mano sinistra. Recuperare delicatamente le chiavi liberate (Si, La, Sol) e disporle in ordine su un asciugamano pulito. (Se lo scovolino è incastrato proprio in cima, svitare anche i due caminetti d’ottava per evitare che i rispettivi tubicini sporgenti strappino o trattengano il tessuto).
- Spinta progressiva dall’alto: Introdurre l’asse metallico dall’alto della cameratura (pozzetto dell’ancia), con la punta liscia rivolta verso il tessuto per preservare la filettatura e il taglio della testa della vite. Proteggendo la testa dell’asse con un panno ripiegato o un piccolo blocchetto di legno, esercitare leggerissime percussioni ripetute con il manico di un coltello o un martelletto. Attenzione: battere bene in asse e con moderazione per non piegare mai l’asta d’acciaio. Sotto l’effetto delle vibrazioni, il nodo di tessuto arretra lentamente e si allenta all’interno del tubo.
- Estrazione attraverso i fori di tonalità: Non appena il tessuto è stato spinto sufficientemente verso il basso, utilizzare un piccolo uncino metallico (o una graffetta raddrizzata) per tirare progressivamente le pieghe del panno attraverso i successivi fori di tonalità, avendo cura di non fare mai leva sulle corone in legno per non intaccarle. Proseguire finché non si riesce ad afferrare saldamente il tessuto dall’estremità inferiore del corpo superiore.
Questo protocollo richiede un’esecuzione metodica, pazienza e grande regolarità nei colpi. Una volta estratto il tessuto, ispezionare e pulire l’interno della cameratura prima di rimontare con cura le chiavi della mano sinistra.
0 commentaires